Update: I’ve written a new HDRI tutorial that covers some more advanced stuff here:
http://blog.hdrihaven.com/how-to-create-high-quality-hdri/
It’s aimed a bit more to professional HDRI creators and assumes you already know the basics, so if you’re completely new to HDRIs you should read this post first :)
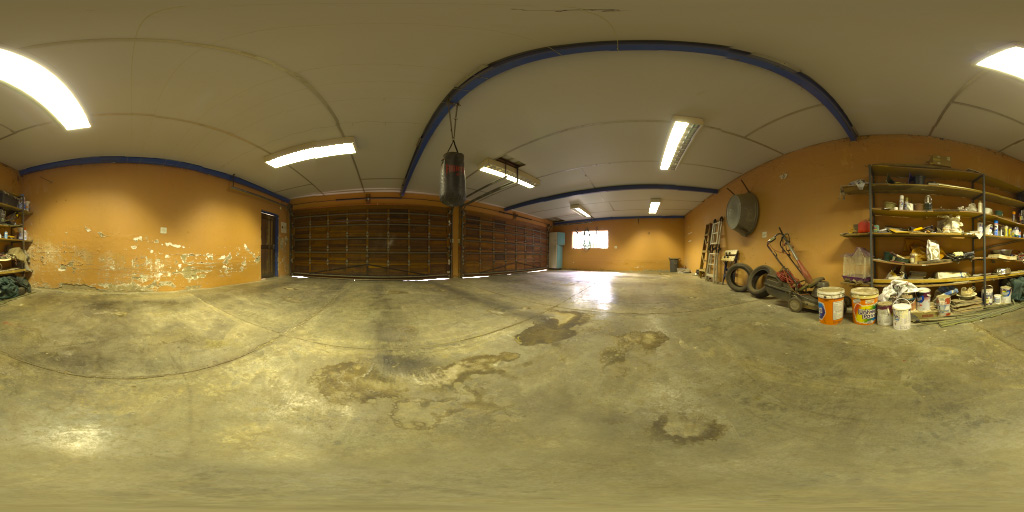
An HDRI. Download it here.
A simple 3D scene that was lit using only the HDRI above (no additional lamps)
There is no easier or quicker way to light a CG scene than to use an HDRI. They are essentially snapshots of the real world that contain exquisitely detailed lighting information, which can transport your bland CG objects into realistic virtual environments.
Not only do they provide accurate lighting, but they can be seen in the background and in reflections, which makes them all the more immersive.
Creating a high quality HDRI from scratch is quite a complicated task that requires very specific equipment and a meticulous workflow. One mistake like using the wrong focal length or choosing a slow shutter speed can mean all your time has been wasted and you’ll have to start all over again.
I’ve been making HDRIs for a couple of years now, so I hope I can save you some time and experimentation. This is by no means the only way to make an HDRI, but it is a good introduction to the process.
By the end of this tutorial, you’ll have made your very own 360º HDR environment map that can be used to light a 3D scene.
Buckle your seat belts boys and girls, because this is gonna be a long one!
What is an HDRI?
Before we actually get into making anything, it’s important to thoroughly understand what it is that we’re doing, and demystify some of the confusion around the subject.
If you’re already confident that you know what an HDRI actually is, scroll down to the “Creating an HDRI” section.
In short:
An HDRI is a panoramic photograph that covers the entire field of vision and contains a large amount of data (typically 32 bits per pixel per channel) which can be used to emit light into a CG scene.
“HDRI” stands for High Dynamic Range Image. “Dynamic range” is the measurement of how much brightness information is contained in an image, so a “high dynamic range” image is an image that has a very large range of brightness, more than you can see on your screen in one go actually.
Most photos and images in general are what I call “LDR” images, or Low Dynamic Range images. They store 8 bits of data for each of the red, green and blue channels for every pixel. An example of an LDR image is a JPG file.
The problem with LDR images is that they are limited to a relatively small range of brightness, from 0 to 255, which is not actually all that much.
If you want to light a 3D scene using an image, what you really need is a format that can store more than just 8 bits of data per channel so that you can have a much larger range of brightness. Luckily, there are several formats that can do this, the most common of which has the extension “.hdr”.
To illustrate the difference between a JPG and an HDR file, all we need to do is play with the brightness:
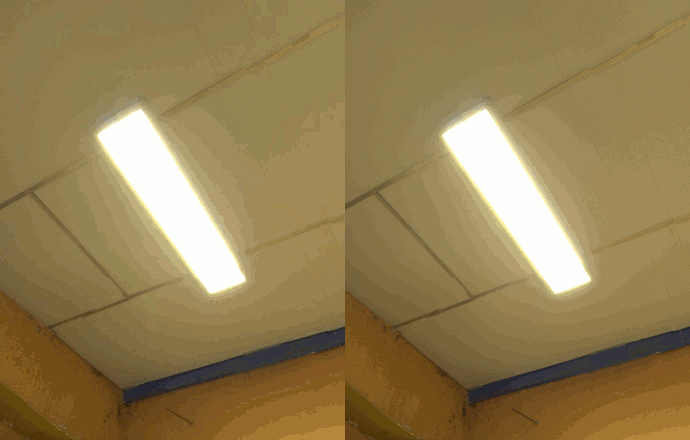
JPG vs HDR when adjusting brightness
As you can see, the JPG on the left has absolutely no detail in the brighter parts, the entire rectangle is a single solid colour. This is because the maximum brightness of any pixel in a JPG image is 255. In an HDRI however, the maximum brightness is practically infinite, which allows the actual fluorescent light bulbs to become visible when you darken the image.
This is a neat trick, but what’s important to realize is that the HDR file stores the brightness of the light bulb correctly. It knows that the light bulb is much brighter than the rectangular area around it, which in the JPG version is just one solid colour. This means that when you use the image to light a 3D scene, the light bulb will emit more light.
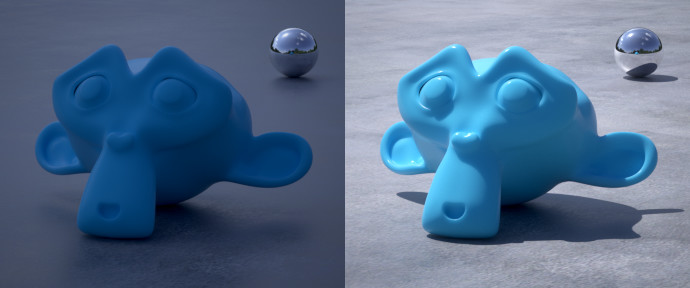
Here’s a simple scene lit using the JPG and the HDRI:
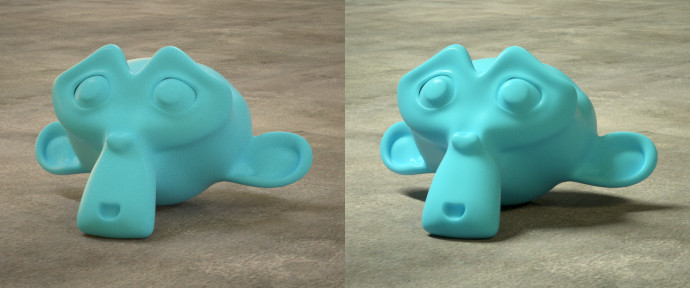
JPG vs HDRI used to light a scene (JPG was brightened to make the comparison more even)
As you can see, the JPG produces flat and unrealistic lighting. The HDRI, however, makes nice sharp shadows and plenty of juicy contrast as we expect from those bright fluorescent light bulbs.
The difference is even more obvious when we use an example that has an even brighter light source, like the sun:
This time the JPG isn’t brightened, all the settings are exactly the same except for the format of the environment image. You can see in the chrome ball at the back that the JPG and HDR seem identical, but the lighting that they create is completely different due to the fact that the HDR file stores the correct brightness of the sun and the JPG is clipped at 255 which is far too low.
If you want to, you can download that HDRI and try it out yourself :)
Finally, I need to address one last confusing point, and that is what some people refer to as HDR Photography.
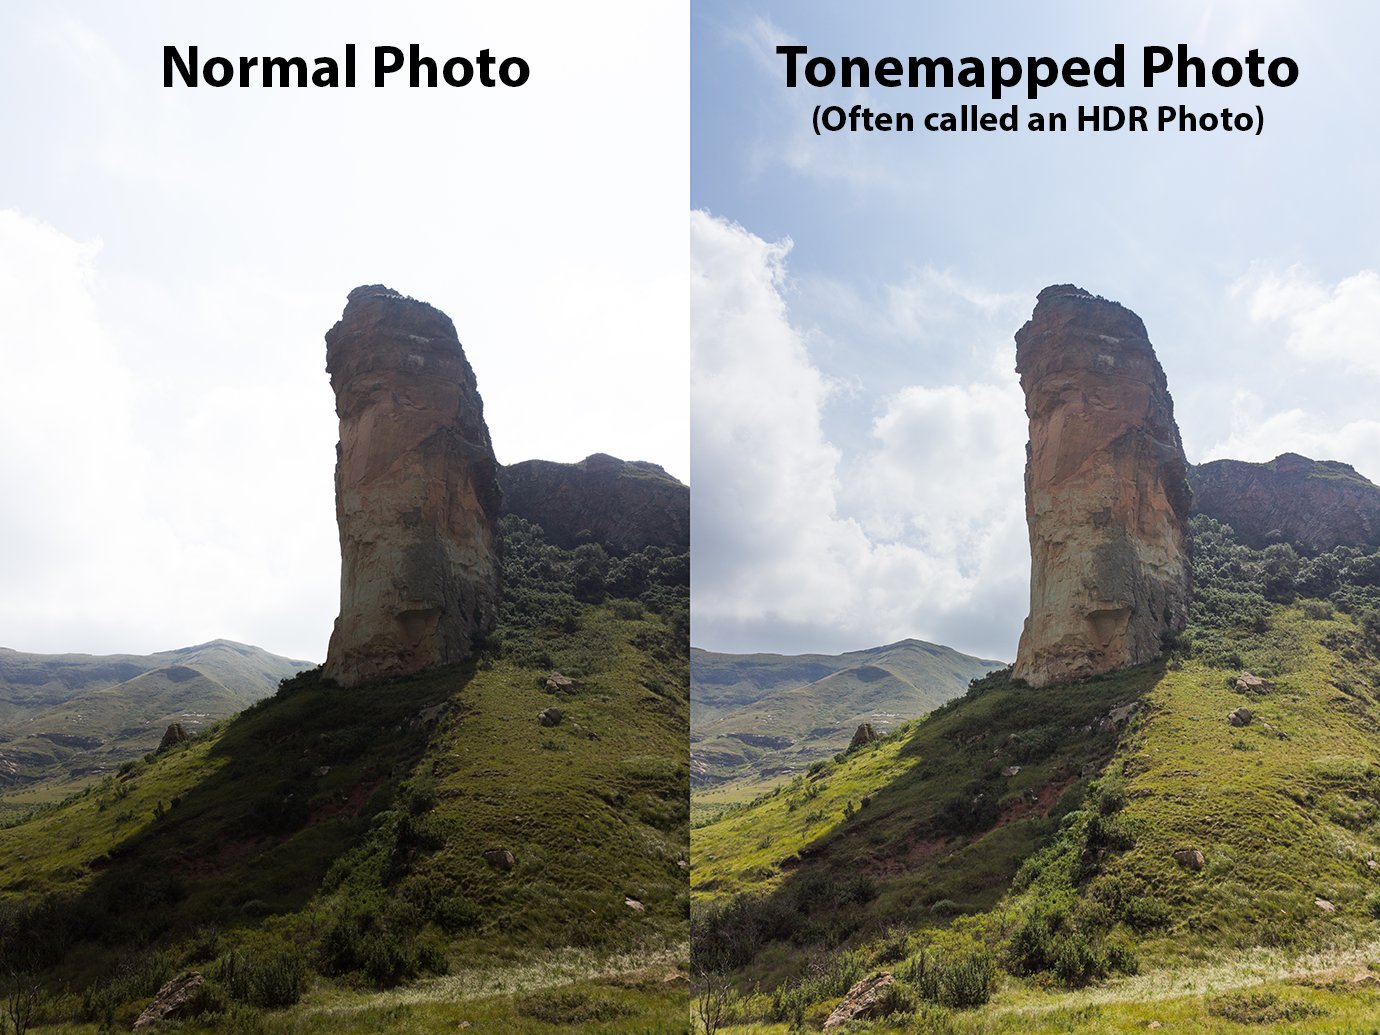
“HDR” photo, not an HDRI by our definition
Although many cameras and tutorials refer to this as an “HDR” image, this type of image can be better described as a tonemapped image. The idea is to take several photos with different exposures, and put them together so that all parts of the image are properly exposed (not too bright or too dark) – for example the sky is usually much brighter than the rest of an image, so the tonemapping software will choose a darker exposure to use for the sky and a brighter exposure for the rest of the scene to balance it out. The end result is an 8-bit image where you should be able to see lots of details that might otherwise be lost in a regular photo.
The reason there is some confusion about this is because the process is quite similar to how you would make an HDRI (the kind we’re making in this article) – you shoot a bunch of photos with different exposures and put them together into one image later. The difference is that with a tonemapped image the goal is to make a regular JPG image that looks nice, while with an HDRI the goal is to make a 32-bit image that stores lots of data about how bright different parts of the image are (which might not necessarily be a very pretty photo) and can therefore be used to emit light realistically into a 3D scene.
A true HDRI will be in a format that can contain lots of data (HDR/EXR/TIFF). It will look just like any other image until you adjust the exposure and discover that it’s secretly storing much brighter colours than you could see before.
If you’d like to see some examples of high quality HDRIs, here’s a free bundle of 16384×8192 resolution HDRIs (or just look at the rest of HDRI Haven, all HDRIs are free at 1k res).
Ok, so now that we know what we’re talking about, let’s actually make one of these bad boys…
Creating an HDRI
There are various ways to make an HDRI, but it’d be impossible to cover every detail in a single article. So I’ll show you a method that gives you decent results with a reasonable amount of effort.
Firstly, you’ll need some gear:
- DSLR camera (anything really, but you’ll see why I recommend Canon below)
- Wide angle lens (less than 20mm)
- Tripod (preferably something sturdy and heavy, but anything will do)
- Panoramic head (optional, but highly recommended)
You’ll also need to download some software:
- Magic Lantern (free) – firmware for Canon cameras, skip if you have a different brand of course
- PTGui Pro (€149) – to stitch the HDRI together
There is a sort of free alternative to PTGui called Hugin, but in my experience it really isn’t usable for this sort of panorama. While you may be able to spend a few days hacking at Hugin to get it to work for you, remember that you’ve already spent a few hundred bucks on camera equipment so a little extra on software that will save you time is a good investment.
Step 1: Shooting
In short, all you have to do is shoot lots and lots of photos at all angles, and for each angle you shoot a bunch of different exposures to capture all the different brightnesses in the scene.
But before we get to that, let me explain some of your equipment choices…
Choosing a Camera
You really don’t need to fork out the big bucks for a fancy camera if all you want to do is shoot HDRIs. If you’ve already got a camera that gives you manual control over everything, just try using that. You may find that you’re a bit limited, so if you want to get a new camera I’d recommend any Canon DSLR.
I currently use a Canon 600D, which was the cheapest DSLR I could find a few years ago. They don’t even sell it any more, but you can get one second-hand for as little as $270 on amazon. Or if you definitely want a brand new camera, the 750D is the new replacement to the 600D and is similarly affordable.
The reason why I recommend Canon is mainly because of the Magic Lantern firmware, which allows you to set up extremely customized exposure brackets, thus allowing you to capture the full range of brightness in almost any scene.
Choosing a Lens
Anything wide (<20mm) will do. The wider it is, the quicker you can shoot an HDRI, but the lower the final resolution will be. It’s a frustrating trade-off: if you want to shoot them really quickly you have to sacrifice some resolution, but if you want lots of resolution you can expect to be standing there for half an hour hoping the clouds don’t move too much while you wear down the shutter mechanism on your camera doing rotation after rotation.
I currently use a 10-18mm EF-S lens (fairly affordable) with my 600D, which means the highest resolution HDRI I can create is about 17000×8500 or so. I previously used the 18-55mm lens that came with my camera, and it worked just fine and gave me even higher resolutions (25k+), but because it’s not as wide I needed to shoot more angles and was thus a bit too slow for regular use. I would start shooting as the sun came up casting beautiful light everywhere, but by the time I’d finished the sun had gone behind a big cloud and made one half of my image look overcast.
I think the sweet spot for a 20 megapixel camera is 10mm (for a 1.6 crop-sensor camera like mine, same as 16mm on a full-frame sensor), as the resolution is plenty high enough for most uses and it doesn’t take too long to shoot.
If you want to work out exactly what the highest resolution HDRI you can create with your lens-camera combo, here’s a formula:
(1/(<vertical field of view in degrees>/360))*<vertical resolution of camera>
You can find the vertical field of view by googling the exact name of the lens.
So for me that would be:
(1/(74/360))*3456 = 16812
In practice this is just an estimate, as the stitching software is never perfectly accurate.
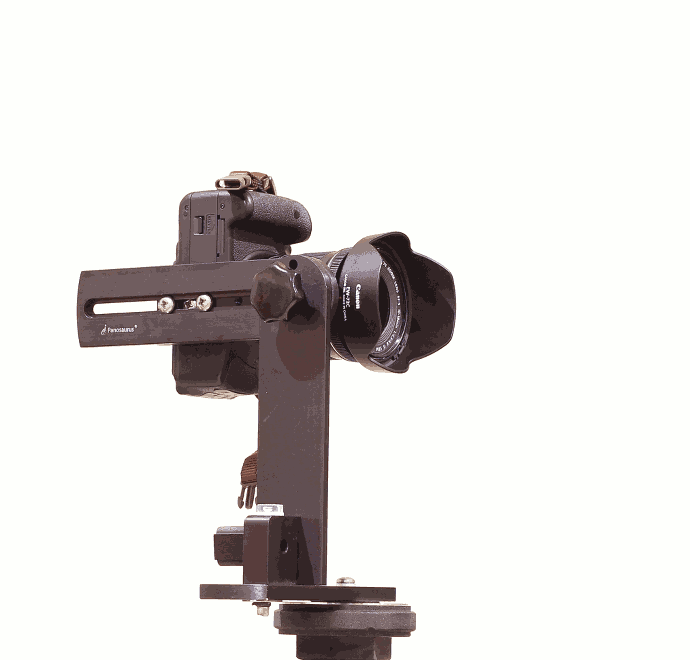
Tripod and Panoramic Head
Literally any tripod will do. If your camera can sit on it, it’s fine. If you’ll be shooting HDRIs regularly you might want to invest in something sturdy, you’ll be rotating the camera around a lot and you don’t want to bump it too much.
A panoramic head is not completely necessary for most outdoor situations, but for indoor shots it is highly recommended. You can try without one for now, but you’ll soon find that you get a lot of seams and stitching errors in your HDRI.
Without a pano head, the perspective shifts slightly between each shot, which makes it difficult for the stitching software to line everything up properly.
Here’s a direct comparison between using a regular tripod (left), and using a tripod with a pano head attached (right):
As you can see in the right image, everything stays perfectly still relative to each other. In the left image however, look at how different parts of the vase (especially the neck) become visible behind the kudu sculpture as the camera rotates. This effect is called parallax, and is what confuses the stitching software.
The closer something is to the camera, the more apparent the parallax effect. This is why it’s usually OK not to use a panoramic head when shooting outdoors.
I use a Panosaurus – it’s nice and sturdy without being too heavy.
Shooting
With the equipment out the way, let’s finally start shooting something…
Depending on your lens and camera, you’ll want to shoot a different number of angles in order to capture the full 360º view of your scene. My rule of thumb is to have at least 30% of overlap between each angle, so you’ll have to play around a bit to see how many different angles you need. If you don’t have a panoramic head, I would suggest figuring this out once and then drawing marks on your tripod to help you rotate accurately without having to look through the viewfinder every time.
If you do have a panoramic head, it probably has the degrees marked out for you and you’ll just have to remember how much to rotate each time.
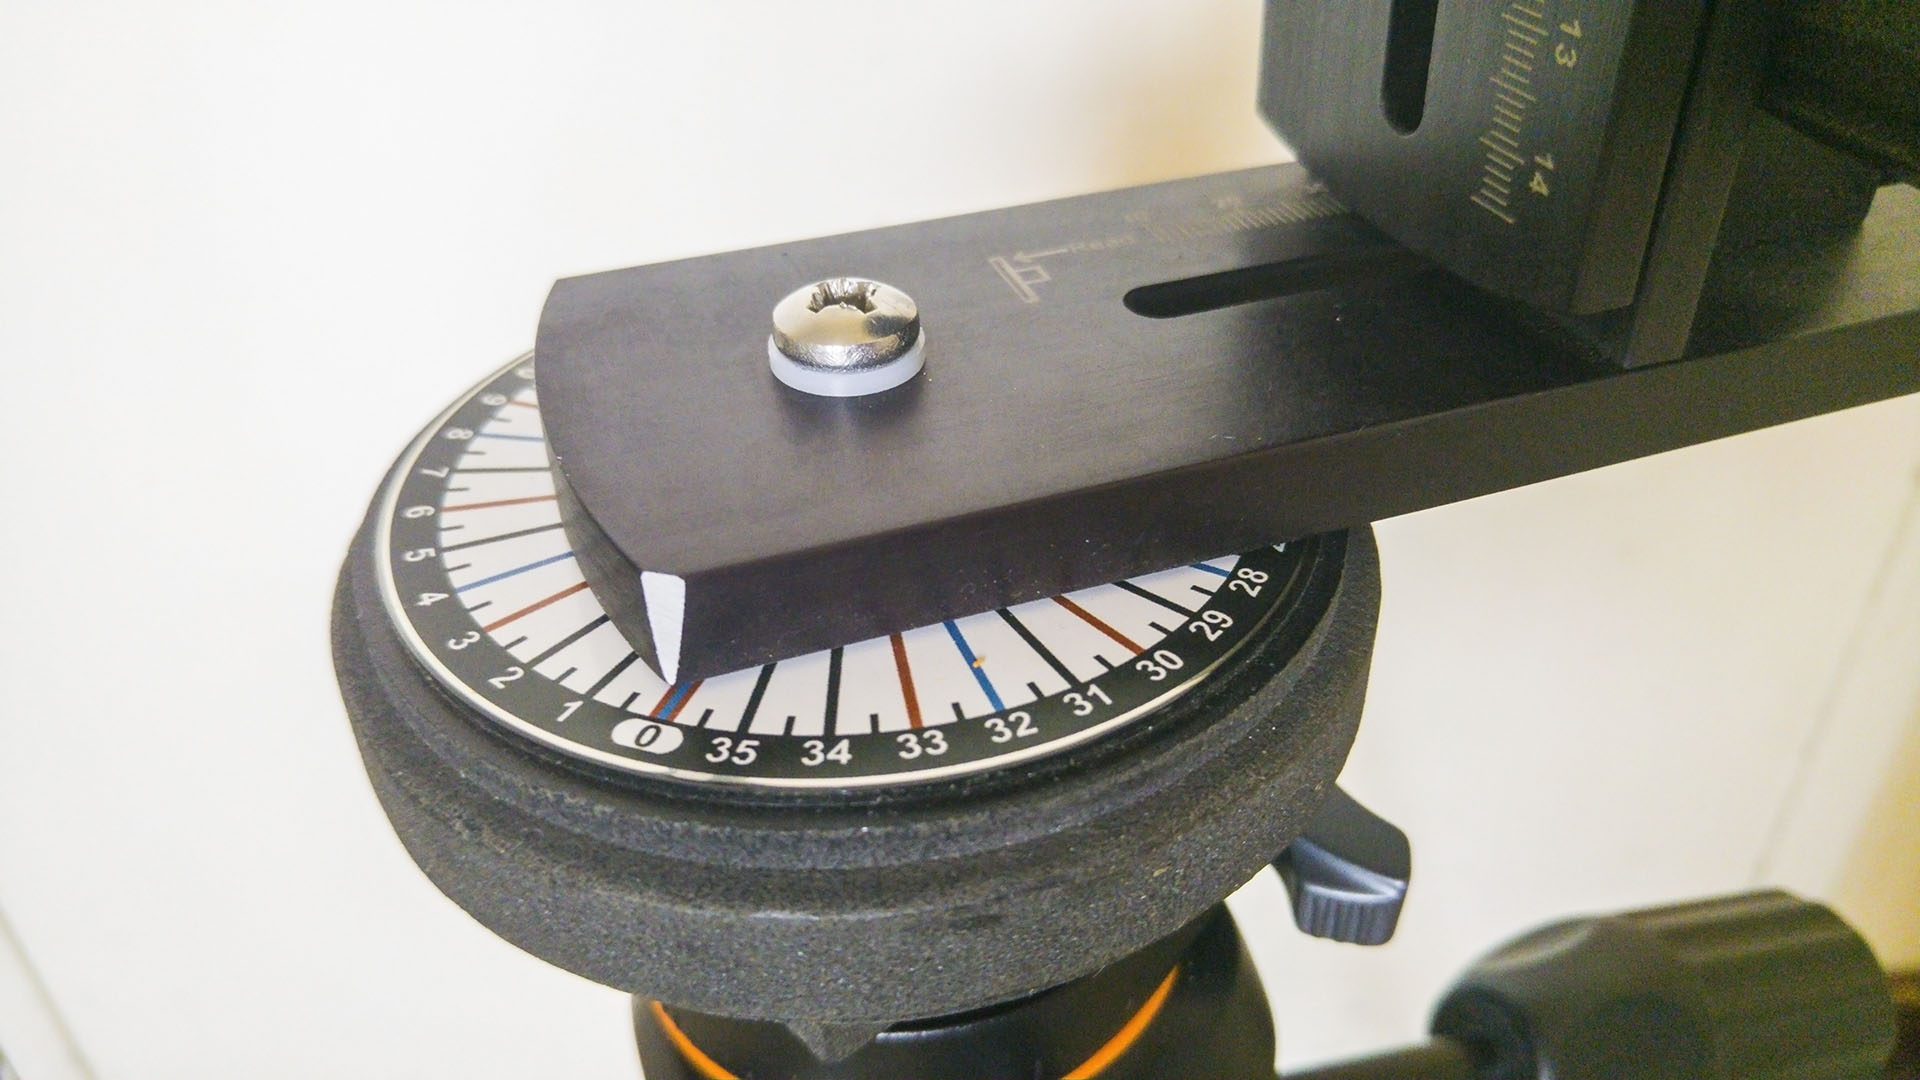
Every 10th degree is marked with a line
Since I have a 10mm lens and a 600D (1.6x crop sensor), I need to shoot every 40º horizontally (9 angles) to capture everything with a decent overlap, and do this for 3 different vertical angles (+45º, 0º, -45º), totalling 27 different angles.
But that’s just to make a 360º panorama, we also need to shoot different exposures in order to make it a high dynamic range image (HDRI). So for each of the 27 different angles, I typically shoot 5 different exposures separated by 3 EVs (starting from 1/4000th going up to 1 second).
Magic Lantern makes this very easy:
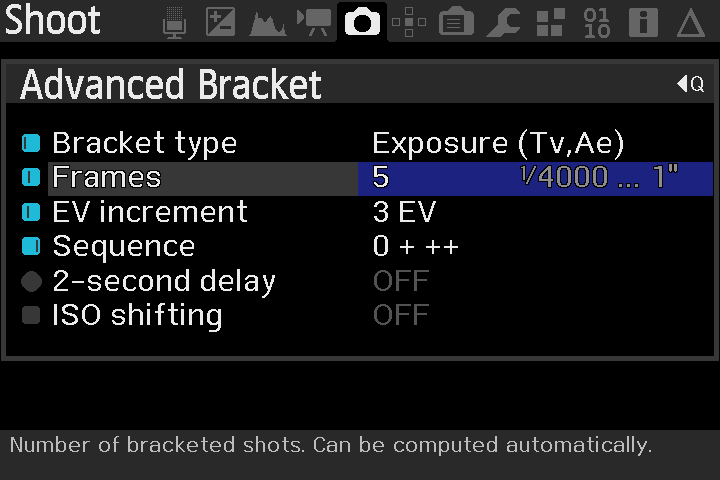
Notice the Sequence option is set to “0 + ++”, which means I just have to choose the fastest shutter speed (1/4000) and it’ll shoot progressively slower until the final image, calculating all the shutter speeds in between automatically.
Make sure your camera is fully manual now – that includes manual shutter speed, exposure, white balance, focusing, ISO… everything. You do not want any of the camera settings to be adjusted at any time while you’re shooting all the different angles. Also make sure that you’re shooting in RAW, if your camera is capable, to capture as much data as you can. Then set the shutter speed to the quickest one you want (in my case 1/4000th) so that bright light sources are not over-exposed, and the aperture to something nice and sharp like f/8.0. You’ll obviously need to play around with these settings, but I find that’s a good starting point.
Now you just rotate the camera to the correct position, click the shutter and it’ll shoot the 5 different exposures automatically. Then rotate to the next angle and repeat.
With my setup, I’m left with a total of 135 images. A real memory card gobbler.
Different situations require different exposure settings, for example a night shot typically has very bright light sources and very dark shadows: You may need to do 7 exposures instead of 5 to capture the full range, use an ND filter to make sure the highlights aren’t clipped, and use ISO bracketing as well as exposure bracketing in order to avoid having exposure times of several minutes (for each of the 27 angles).
Step 2: Cleaning
This step is optional, but I always do it to get the best possible quality from my HDRIs.
All we need to do is remove some of the lens artifacts in the photos, such as chromatic aberration, noise and vignetting. There’s a two-fold reason for doing this:
- Removing imperfections means prettier HDRIs
- It makes stitching easier – chromatic aberration and noise can sometimes confuse the stitching software
I recommend you use Lightroom for this, because it allows you to export 16-bit TIFFs that retain the EXIF data (a record of all the camera settings), which is absolutely required for stitching. There may be some other free software that can do this, but I don’t know of any. If there is no EXIF data, you’ll have to enter the exact shutter speed for each of your 135 images, which would be a real pain in the ass.
If you don’t have Lightroom, you can safely skip this step.
So once you’ve finished shooting, plug in your memory card or camera, fire up lightroom and import all the images.
Pick one of the well-exposed images (just so you can see what you’re doing, and head on over to the develop tab.
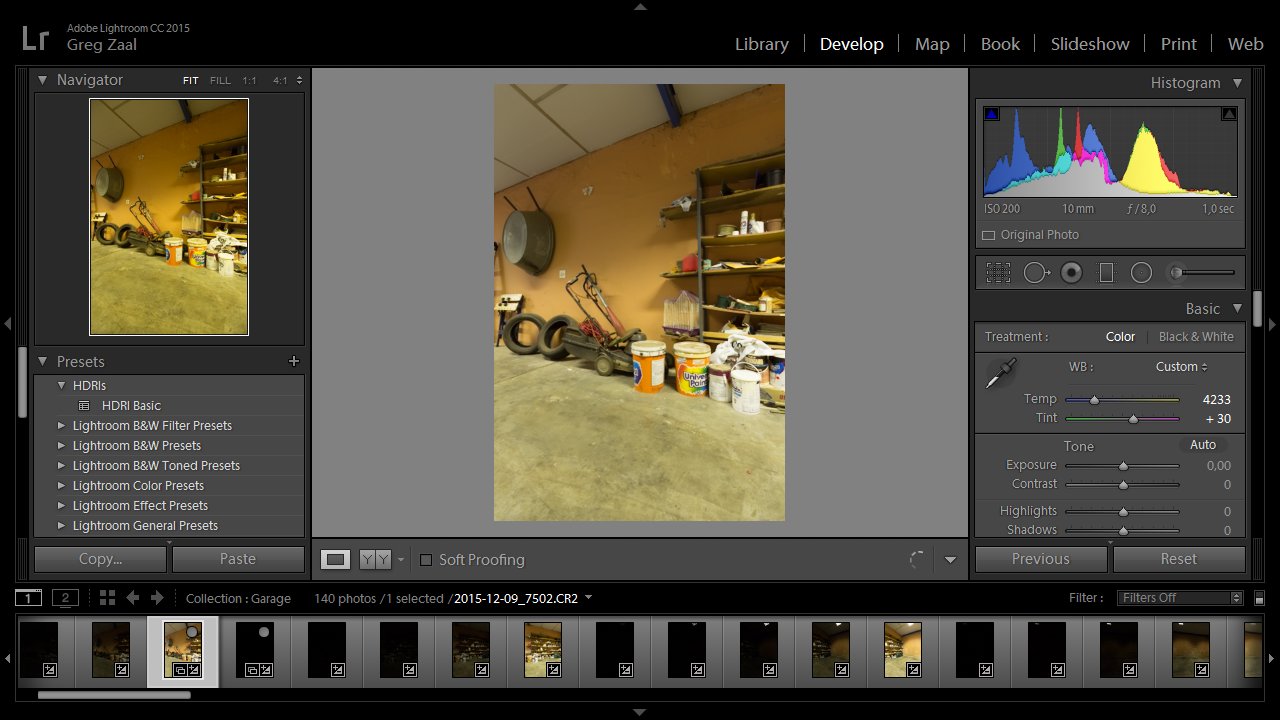
If you want to adjust the white balance at all, now is the time to do it. This image is a little too warm, so I’ll adjust it slightly.

It’s important not to do anything too drastic here, like adjusting contrast or exposure to make it look pretty. Our number one priority is to maintain realism, all we want to do is fix things that are artifacts, like chromatic aberration.
So if you zoom into one of the corners, you’ll probably see some subtle purple/green or red/blue colour fringes:

This is easily fixed, just turning on the “Enable Profile Corrections” and “Remove Chromatic Aberration” in the lens corrections panel usually does a pretty good job:

You may need to look at the Profile tab and select your exact camera and lens combo if it’s not detected automatically.
Then all we have to do is copy these settings across to the rest of the images, so select them all at the bottom (Ctrl-A) and click the “Sync” button at the bottom right.
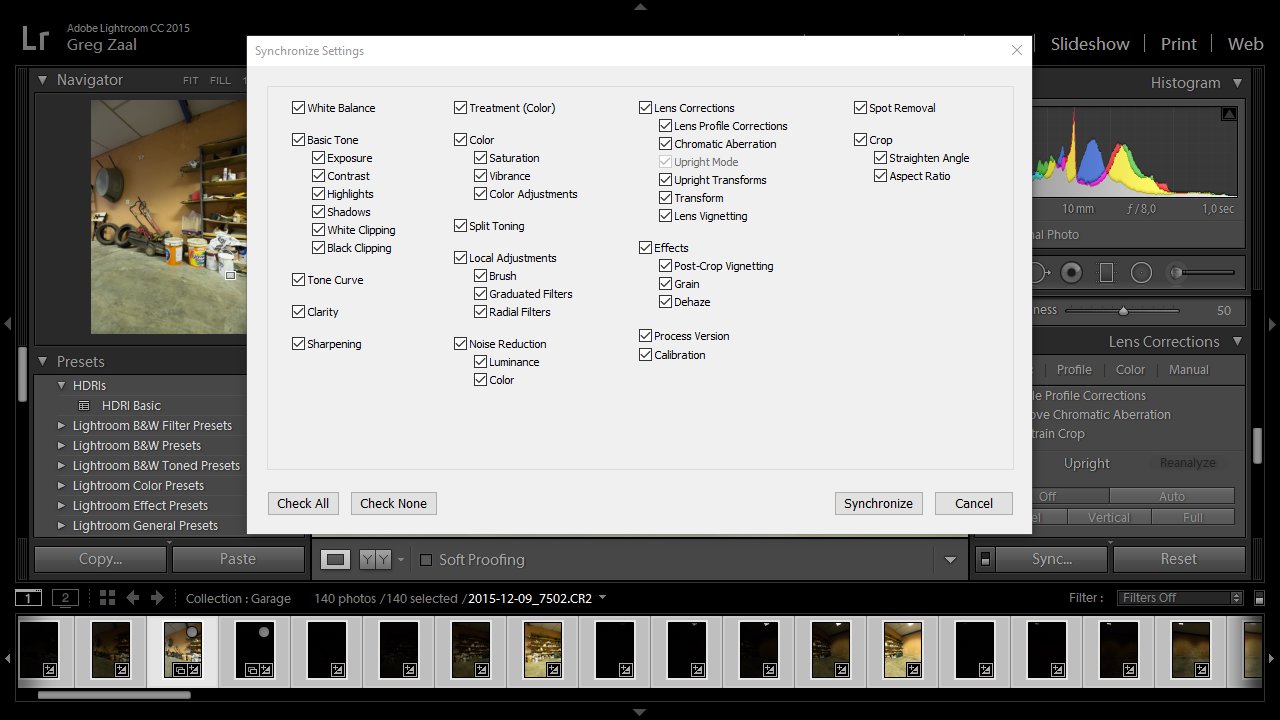
A window will pop up with all sorts of checkboxes. Just click the “Check All” button at the bottom left of that window, and then hit “Synchronize”. This will update all the selected images with the lens corrections and white balance adjustment.
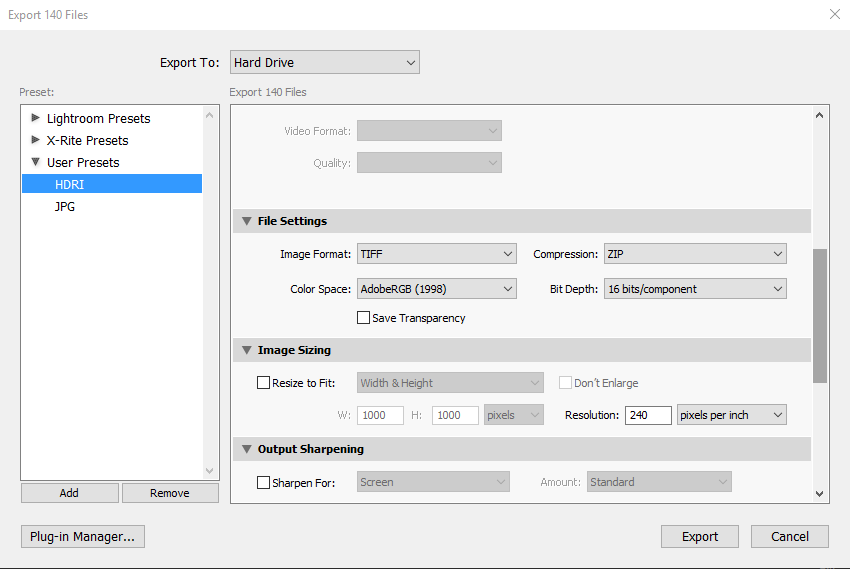
Finally, hit Ctrl-Shift-E to export the images (also accessible from the file menu). You can put them wherever you like, but the most important thing is to set the output format to 16 bit TIFFs:
Step 3: Stitching
Now the fun part!
When you fire up PTGui you’ll see a simple screen like this:

The first thing to do is to bring in all our images. So hit the “Load images…” button, select all the files that your exported from Lightroom (or if you did not use Lightroom, just use the files you copied from your camera).
You’ll then see a long list of thumbnails. You may need to wait a little bit for these to finish loading before you continue.

The first thing we need to do is tell PTGui that this is an HDR panorama and link all the exposure brackets together so that it’ll understand that every 5 images is actually one photo (just with different exposures).
To do this, just go to Images > Link HDR Bracketed Exposures.
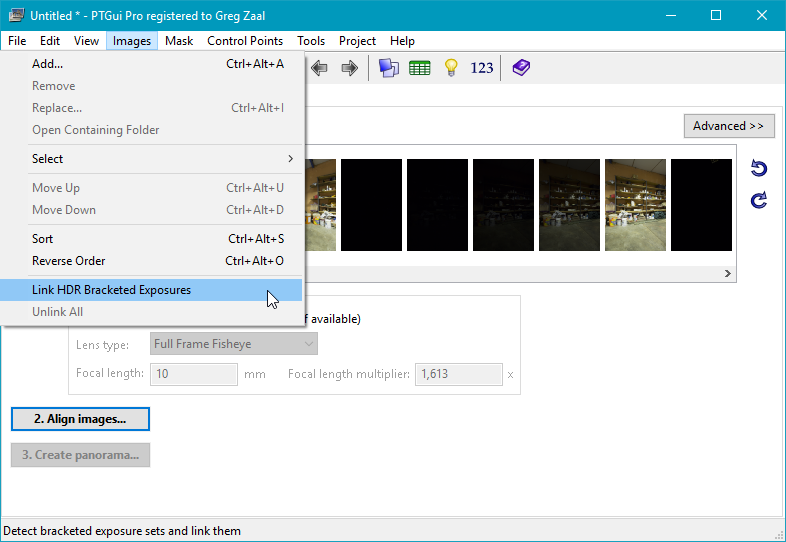
A confirmation dialog should pop up and tell you how many sets of how many brackets there are (in my case, 28 sets of 5 brackets). Just hit OK.
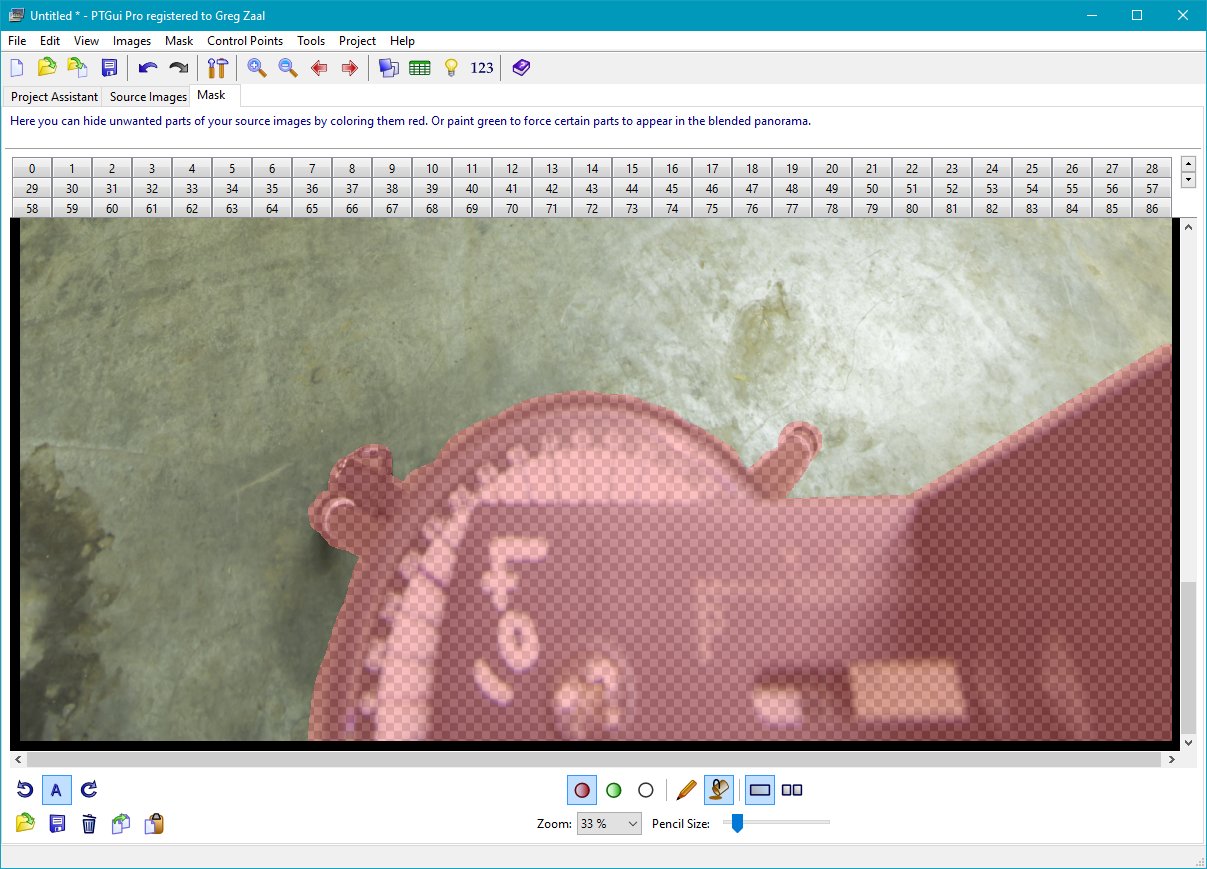
Now before we align the images, it’s a good idea to do some masking. We basically want to tell PTGui not to use certain portions of certain images that might confuse it.
An example of such an area would be the tripod that is visible at the bottom of some of the images – since some of the tripod (or pano head) is rotating with the camera, PTGui might get confused if it matches that area in each image.
Another thing we want to mask out is lens flares – when you add a mask in one image, PTGui will replace that portion of the panorama with content from a different photo, which will magically remove the lens flare.
So head on over to the Mask tab and slowly go through each image, and paint over anything you don’t want to see, like lens flares, the tripod, your own shadow, etc using the red mask. You’ll notice that since our exposure brackets are linked, you don’t have to paint on every photo, just one from each bracketed set. Since your tripod mask will look identical on every image, it’s a good idea to paint it once and then use the Copy/Paste buttons at the bottom left to speed things up. You can hold Shift to draw straight lines, or Ctrl to fill in an enclosed space.
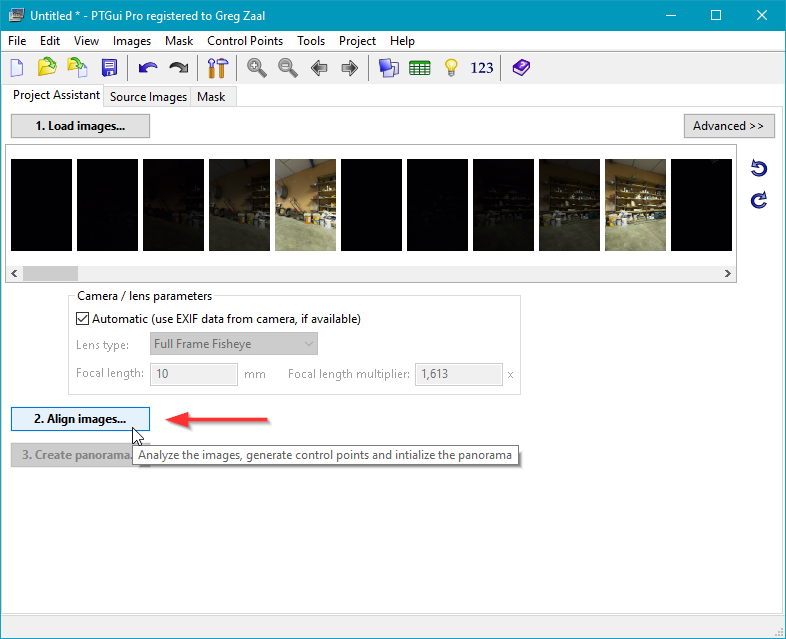
When you’re done with that, go back to the Project Assistant tab and click Align images.
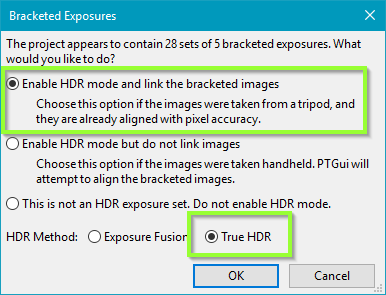
Another window will pop up asking about bracketed exposures. Make sure you choose the first option (linking the images again), and also choose “True HDR” at the bottom since we don’t want to tonemap the image.
PTGui will now go through all the images and try to find similar points between each of them (called “control points”). Usually it’s pretty good at this, but sometimes it will struggle a bit and may ask you to add control points manually (which is a time consuming process).
Lucky for me, it did a pretty good job on the first try!
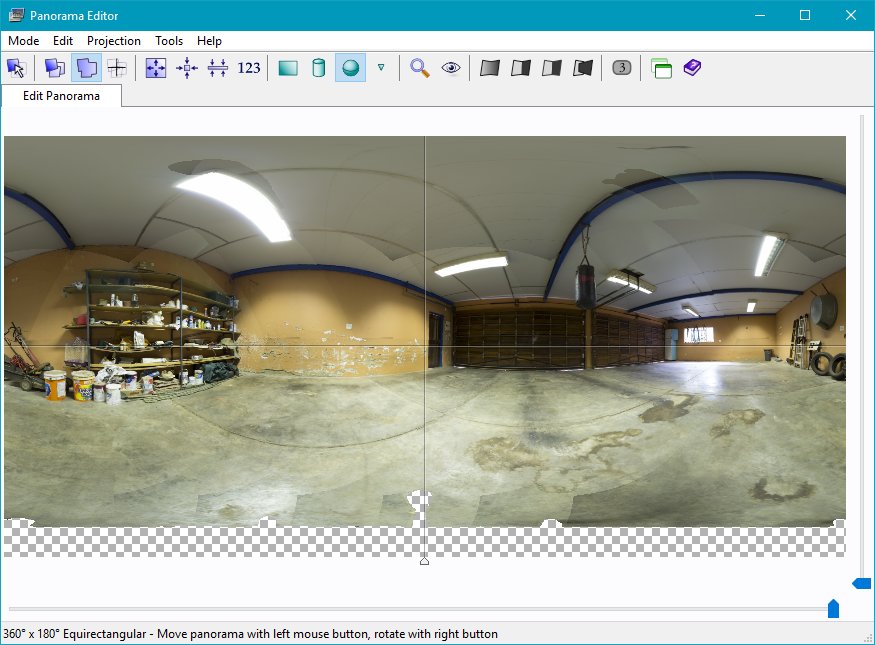
If the Panorama Editor window isn’t already open, you can open it by hitting Ctrl-E. This window shows you (roughly) what the final panorama will look like, and lets you drag it around with the left and right mouse buttons to adjust the rotation.
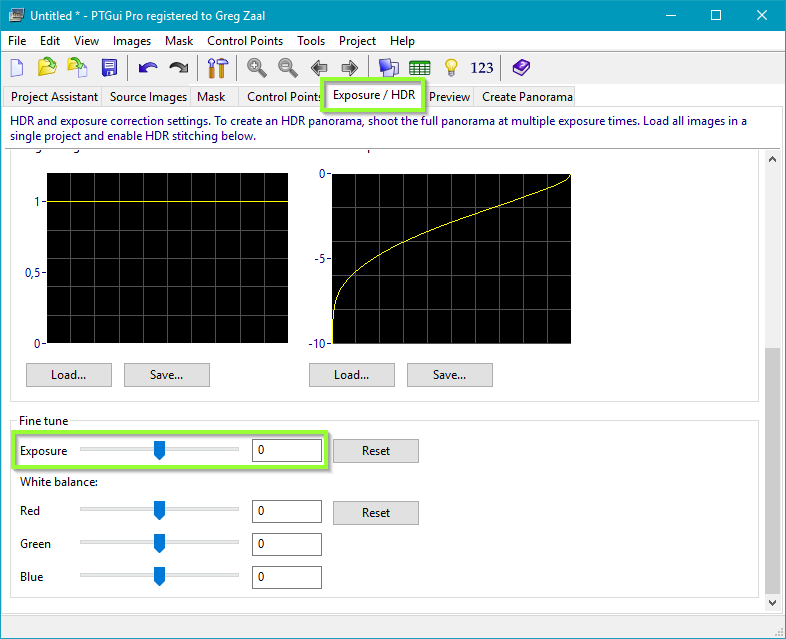
If everything looks too dark or too bright, adjust the Exposure slider in the Exposure/HDR tab.
Just before we click the magic button, lets save our project in case anything goes wrong. As you can expect, you can just hit Ctrl-S or use the file menu.
And that’s it!
All that’s left is to choose what resolution we want in the Create Panorama tab (click “Set optimum size” to use the highest resolution possible), disable the JPG output option and finally click “Create Panorama”!
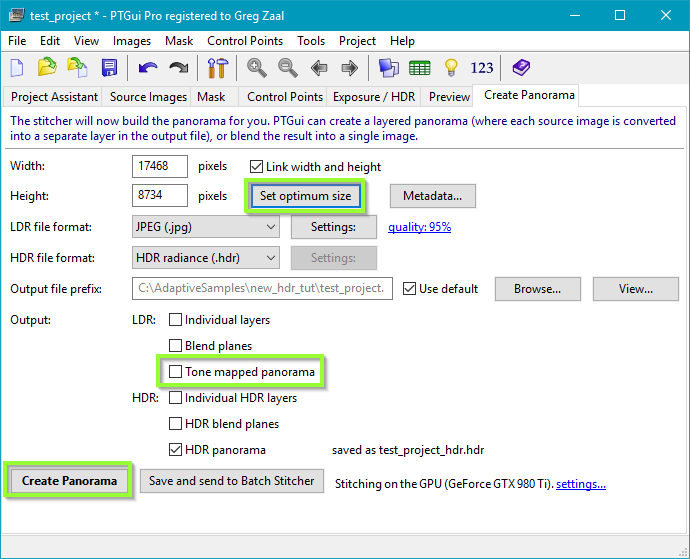
Depending on how powerful your computer is and what resolution you chose, this might take anywhere between a few seconds and several hours.
Once it’s done, there should be a .hdr file in the location that you saved the project!
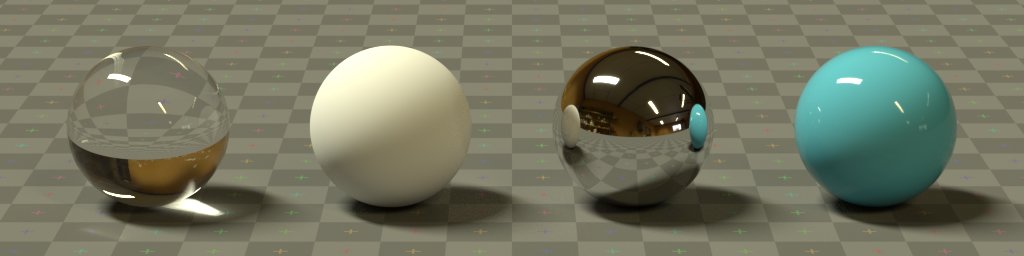
Step 4: Try it out!
Now that we have a real HDRI that we made all by ourselves, let’s see what sort of lighting it creates!
To do this in Blender+Cycles is stupidly simple. In fact it only takes 15 seconds:
So there you have it! Feel free to pat yourself on the back for a job well done!
Now go find some interesting places to shoot HDRIs and share with the rest of us :)
PS: The final HDRI created in this tutorial can be downloaded from the top of this page.
Nice update to the old post but i was in the middle of previous tutorial when this update came :). Can i find previous one?
Hah, sorry about that :) You can find it here: https://web.archive.org/web/20150912133026/http://blog.gregzaal.com/2013/11/17/how-to-create-your-own-hdr-environment-images/
Though just beware that some of the software screenshots are out of date, and the method in this updated version is much simpler.
Having also created some of my own HDRI panoramas using the older version of your tutorial (which has been a great resource, so thank you very much!), I am curious as to your reasoning behind the updates. Specifically why you have chosen to skip the “merging” step. In the previous version of your tutorial you recommended batch merging the bracketed photos before to speed up the panorama creation within PTGui. What has changed that makes you feel this step is no longer necessary?
Excluding the separate merging step and letting PTGui do that instead makes this tutorial simpler and easier to follow. When I make my HDRIs I still do the merging separately because I like to correct chromatic aberration and noise in Lightroom first, but this is totally optional.
Great tutorial
Wouldn’t it be great if blender handled the sucking together of HDRIs
Ahhhhhhhh stitching. I’m will thumbs today.
Great tutorial! I’m just starting out, have you considered using a fisheye lens to take two images for a full 360? I’ve been reading up on http://gl.ict.usc.edu/Data/skyprobes/ and got that idea.
You certainly can use a fisheye, it just means the final resolution of the HDRI will be quite low.
Great tutorial! I am curious about your computer specs (ram, graphic card, etc…)? And how well does it handle the stitching process of 135 images? Thanks!
i7 2600k, 28 GB ram and 980ti. Stitching is a blast with PTGui’s GPU support, speed is only an issue for the parts dealing with all the original files (copying from camera, importing in lightroom, exporting from lightroom, importing in PTGui), after that things speed up significantly as long as you have enough ram to handle all the images at once.
do you know a good 360° cam to do the job ?
nice tuto btw
thanks
I don’t, sorry :) I would never use one myself unless it could do 16k resolution (134 megapixels) and custom bracketing.
8000×4000 is ok?
http://shop.nodalninja.com/collections/featured-2/products/iris360
For lighting and reflections, yes. If you can see the HDRI in the background, then you’ll want at least 14k (if rendering at 1080p with a 35mm focal length).
I was thinking about ways you could do this (the software part) for free, and came up with this, although it is more similar to the old method.
1. Use Luminance HDR to batch create 32-bit HDR images in the .tiff format
2. You could edit the images to fix problems if you want
3. Use Microsoft Image Composite Editor (a good panorama stitcher which supports ‘high-bitrate’ images) to combine the tiffs. Finally export the panorama as a tiff, which you could convert if you want.
I’ve never tried ICE, but on the homepage it says “Support for input images with 8 or 16 bits per component”, so it wouldn’t be able to use 32-bit HDR images.
In the comments section of this: http://www.dpreview.com/articles/3229856540/microsoft-image-composite-editor-2-0-offers-new-panorama-features-and-improved-interface, someone who appears a Microsoft employee (matthewu) says:
“But the engine is >8bit, given 16bit images ICE will produce a 16bit result, given 32bit (HDR) sources ICE will produce a 32bit result. Every feature (including Auto-Complete) supports this.” :-)
Well great :D let me know how it goes.
Great tut Greg, i have a question though. i have a license for Kolor autopano where i do my stitching usually. but i need a free software to export my images first in .exr or .hdr format. do you know such software? thanks
Picturenaut is pretty good (http://www.hdrlabs.com/picturenaut/ ), as is Luminance HDR (http://qtpfsgui.sourceforge.net/ )
This is a super tutorial Greg, Thank you! How do I determine the required angles both vertically and horizontally with my given lense/camera combo? Panasonic GX1 and 14mm f/2.5 pancake lense (m4/3).
Experimentation! At 14mm with a 2x crop factor, you’re gonna need quite a lot of angles.
Thanks Greg. Where are getting the 2x crop factor from?
Googled “Panasonic GX1 crop factor” – it just means that 14mm isn’t as wide as it would be on a full-frame camera or even an APS-C camera like mine (which has a 1.5/1.6x crop factor)
Hey Greg, thanks for the tutorial. I’ve followed your tutorial before with success, but with a new batch of images I shot, none of the HDRIs I’m generating are working properly in my 3d app (modo). I can load up any of your HDRIs into Modo or and older HDRI I made a while back and will get accurate lighting for what was shot. But now, all I getting is a heavy blue cast and soft shadows. Have you ever run into this? Would you mind taking a look at some of my files to see if there’s something wrong I’m doing?
my files:
https://www.dropbox.com/sh/jcder28z2383d4z/AABOBHik_mSlHOcWLhZYK8KOa?dl=0
It’s a problem with how you’re shooting the HDRI – you’re not capturing the full dynamic range of the sun (a very common problem). See here: http://blog.gregzaal.com/2016/02/23/what-makes-good-hdri/
Still searching how to use a 360 camera with Revit…
Thank you very much for this tutorial… I understand better what HDRI is.
Hello there! I hope im not late for the party :D
Anyways, this guide help me a lot with the process (I’m already working with some panoramas. However, how do you deal with the masked part? I mean, im getting blackholes in my output files :(
If you’re getting black areas that’s because you’ve masked out that spot in all images where it appears
I get it. Anyways, discovered a way to patch the Nadir and get rid of the tripod. Thanks anyways :D
Awesome tutorial Greg, I just bought HDRI Haven Bundle: Skies 03 :)
Thanks!
How are you exposing for the sun, in order to avoid star line artifacts and instead getting a clean circle at the darkest exposure? We do full frame 1/16000th iso 100, fstop in the clean middle ground with a fisheye, and it’s tough getting dark enough. Are your haven skies bundles being made with ND filters?
The sun stars won’t show up when the sun is properly exposed. I am indeed using ND filters, which is absolutely necessary to get the sun exposed properly. Usually I do 1/4000 (max of my camera), ISO 100, F22 (hence the sun stars when over exposed) and a 12 stop ND filter.
I suppose then using a fish eye isn’t feasible when doing suns? The issue is mainly on set, where they don’t give the hdri guy much time to get his shots. We’re usually only given 3 angles with a full frame 8mm. I’ve seen the hack of taping an ND filter to the back of the lens, but that would introduce a host of other problems, they told us.
Unfortunately not :( Though some fish eyes (or super wide rectilinears like the Venus Laowa 12mm f/2.8) can have separate filter holders attached to the front where you insert 100mm square filters – this might even be more convenient than screwing filters onto the lens, I haven’t tried.
Some lenses accept little gel filters at the back, I don’t think those cause any problems, but if you’re just taping filters to the back I guess it should work as long as you don’t get anything in the way of the metal contacts or locking mechanism.
And thanks :)
Hi Greg, Great tutorial. Do you have any suggestions on how to clean up the masked areas where the tripod has been removed? I notice the large transparent are on the bottom of your image.
Thanks,
David
That’s covered pretty well here: https://www.ptgui.com/examples/vptutorial.html
Thanks so much for that and I really appreciate your quick reply.
D
Thank you very much for your great tutorial!
One question Greg:
How can I setup manually exposure if I don’t want to use Magic Lantern? I heard I will lost my void warranty.
By the way, we have the same Camera (if you have it now) and I’m thinking ti buy the same lens (Canon 10-18)
Most cameras have some form of exposure bracketing feature, but it’s usually far too small to get anything useful for HDRI purposes. The 600D can only do 3 shots, 2 EVs apart, which is basically useless.
There’s really nothing to worry about with Magic Lantern, this has been asked a thousand times before, just read the FAQ: http://wiki.magiclantern.fm/faq
Thnx for your quick and so helpful reply Greg.
Another one last question…Do I need a lens hood for landscapes?
Helps keep the sun off the lens when you’re not directly looking at it, so yes it’s a good idea.
Ok, thank you very much!
Is this KIT a good start for someone who wants to start professionally or need more professional equipment?
Than you Greg!
You mean the 600D + 10-18mm lens? I still use that same combo, apart from dark night-time stuff it works great :) You definitely need a pano head too.
Exactly I’m talking about the same combo!
For now I marked the horizontal angles every 40º and every 45º for up & down on my tripod. It has black marks by itself, so I draw white marks to the angles you mentioned.
Thnx a lot again!
3EV’s must be default with this combo or I can play with more EV’s?
I normally do increments of 2 EVs, and 4-7 shots depending on the dynamic range required.
When you say normally (except the fact of the dynamic range required) you mean for indoor & outdoor scenes?
Yes
I’m really very thankful for all your help Greg!
Have a nice day!
This is a very interesting tutorial… now onto the question of creating HDR… could these same steps be used for creating HDR Skies from program like Vue? I usually do a lot of HDR skies in Vue and it would be nice to be able to generate full HDRs from this.
I guess it could, though I’ve personally never found the need to use CG skies of any kind.
True… but I went ahead and downloaded LuminanceHDR, and messed about in Photoshop, and now I have True HDR skies. Because Vue HDR files don’t carry the range I need, I had to do the old fashioned exposure trick and manually add the lux value of the sun to ridiculous levels. Now my game levels look very natural.
I’m super disappointed the image sequence wasn’t included… I wanted to try it right away but it is the middle of the night. Well I guess understandable with over 100 high res high bit rate images.
A good reason to go and shoot your own ;) yeah it would have been good to include the images I guess. I’m not sure if my server would survive if many people wanted to download the ~4gb of files, but it doesn’t matter as I actually don’t have the raw images anymore.
Yeah… though you could have made a torrent file of it and used that. It is pretty efficient way for use cases like this. (Well not that it matters since you dont have the raws anymore. But still it’d be kind of nice to be able to just try the software workflow right after reading the guide. Most of us probably don’t have the panoramic head. And with the image set you would avoid having to go back and forth shooting and debugging what you did wrong while shooting etc. Well still useful guide is in my bookmarks. Hopefully I’ll be able to actually produce something useful soon P: )
I don’t know, I’d have to seed the torrent for ages before a few more people willing to seed come along. Server bandwidth is cheaper than my own bandwidth.
You can get by without a panoramic head for a while, at least until you decide it’s worth the investment.
Getting things wrong is the best way to learn how and why it all works (or doesn’t work). Having a decent set of images as reference would be helpful I’m sure, but you have to shoot your own stuff to actually learn anything.
Hi Greg
Just a question
You said you a Canon 600D with a 10-18mm. Right?
How did you manage to get up to 24 EV’s HDRi, as this camera model has a total dynamic range of 12 EV’s? It’s not an attack, just a question because we have the same camera.
https://www.dxomark.com/Cameras/Canon/EOS-600D—Measurements
No camera sensor can capture much more than 14 EVs with a single shot, and we typically don’t even mention this in the dynamic range rating of the HDRI – the 24EVs is purely the number of stops between the various exposure brackets taken (e.g. 1/4000″ to 4″ is 14 EVs). Going much higher than that usually requires the use of ND filters (and/or variable aperture), but this is not so straightforward so I plan to cover it in more detail in a series of videos in future :)
Yes thnx Greg. I got it after a lot of reading….
So today I bought a ND 400 filter.
I’m also think about a star filter.
One question Greg about ND Filters. Do you use Vari ND or Regular?
Definitely regular, afaik regular ones can have vignetting or inconsistency issues with wide angle lenses.
Afaik? You mean fake?
“As far as I know”. Google is your friend ;)
So this means that you have issues too?
Ah, I mistyped, edited now.
Exactly! The “x” effect, right?
Sorry if i bother you Greg, but we have exactly the same camera and lens. It would be great if i’ll learn from you!
Do you still keep shooting with same angles you mentioned?
I asked you because i have some stitching problems.
Lens must be in the center of the pano head? I mean in the x & z axes?
Is this a good choice Greg?
http://www.fotomarket.gr/hoya-pro-nd500-67mm.html
or
http://www.fotomarket.gr/hoya-pro-nd1000-67mm.html
Thnx for everything Greg!
I think I have to retire from this.
Problem with nadir, zenith, PTGui doesn’t work well with your angles or any angles for any panorama (interior or exterior)
I believe it’s not so simple but complicated.
Without some “secrets” or someone to learn you, a simple guide is not enough.
Unfortunately I have nobody to learn me. So…
Thnx anyway!
You’re giving up already? There are no secrets. I can’t devote every minute of my spare time to helping you, you need to figure it out yourself. Try enabling Heavy+lens shift distortion correction in the optimization tab. Check the control point table, delete ones that have a high error, replace if needed and reoptimize again. You don’t learn anything by following my blind instructions, you have to investigate and figure it out yourself.
Thats what I did Greg. But I’m on an island without fast internet.
I cant search a lot. All I do is searching by myself. But…
Although Autopano works better for me but I don’t now if it gives the same exposures results with PTGui.
By the way, did you know this?:
http://www.vrwave.com/panoramic-lens-database/canon/
N, 6 images every 60° at -30° pitch, 6 images every 60° at +30°, Z
Works better for me. And with our 1.6 DSLR Frame
This is my first try.
https://as-dimension-z.deviantart.com/art/First-Unclipped-HDRi-Environment-Light-699779342
Thnx a lot Greg for everything!
OK. I found something.
Channel Mixer…
Very important tool in Photoshop.
The only thing that I’m still searching, is how do you keep the contrast ratio on your hdri at 1100-1600:1.
But I will find it…
One thing.
Where I can find a complete guide about hdri? Or a book.
Not for HDR, but for HDRi.
Any searching on Google I find only for HDR or the same simple steps like you made on this article.
Sorry again Greg. I’m just not so patient!
Just 3 questions and I won’t bother you anymore (for exterior scenes):
1. Do you shoot every angle with ND Filter or only the sun? (Because you need to lower shutter speed)
2. What is the best way to merge the exposures?
3. Exterior (with trees, etc) only without wind?
Thnx again & Sorry!
My basic problem is this:
Do I need to shoot every angle with ND Filter or only the sun? (Because I need to lower shutter speed) and if so what about windy weather?
If there are a lot of tutorials will be very easy for me. But you are the only one you know about environments. So don’t worry Greg about your work because you’re the only one.
Thnx a lot! Keep your great working!
Hi,
Thanks for this tutorial, I have a few questions:
what is the frames and sequence equivalent in your bracketing camera settings to shooting with a nikon dslr or fujifilm xa3? I don’t have the frames and sequence option in mine?
what is better to use dslr or slr for hdri shooting?
is it better to shoot a chrome ball instead of turning the camera 360 to shoot if you don’t have a panoramic head or tilt stand?
I don’t know what’s possible with nikon or fuji cameras, but you need to be able to shoot at least 5 brackets spaced by 2EVs at the bare minimum. If you want to capture all kinds of light unclipped, then 9 brackets.
I assume you mean DSLR vr mirrorless. Non-digital SLR would make for an unnecessarily complicated process, but mirrorless (in theory, assuming it can do the required bracketing) is fine.
Chrome balls are a fast method, but will severely limit your output resolution and overall quality. Still useful if you only need the lighting captured and don’t care about clear reflections or background (thus quite popular on VFX shoots afaik).
Thanks for the prompt reply. Sorry but I’m a noob photographer.
I’d just like to know what the sequence and frames does in your camera settings so I may find the equivalent of that function in mine?
– My mirrorless fujifilm has no option to adjust exposure, and its bracketing is only -+1 EV, while my Nikon dslr can adjust up to +-5, but does not have bracketing. Can I compensate for this by manually getting a lower or higher EV look by adjusting shutterspeed, iso and aperture per shot? Would that entail the same result as -+2 EV setting you are talking about that can still work in an HDRI stiching program?
– Can you still achieve 24EV hdri like yours from only using 5 EV brackets? How do you check what level of EV is your final hdri?
– I don’t have a pano head or tripod that rotates, can I still do this just by rotating my camera mounted to a steady tripod per angle shot?
Great tutorial although I was thinking about how you would deal with clouds and the sun moving across the sky in the time needed to take the photos because I would think that in each photo the clouds and sun would be in a different position but I’m not sure
Yeah this can definitely cause some issues. Just shoot as quickly as possible, and try to blend the clouds together when stitching if it’s really noticable.
Edit: example of this done badly: https://hdrihaven.com/hdri/?h=symmetrical_garden
example of this done well: https://hdrihaven.com/hdri/?h=delta_2
Hi,
Hopefully you can still answer my question,
Sorry but I’m a noob photographer. I’d
just like to know what the sequence and frames does in your camera
settings so I may find the equivalent of that function in mine?
– My mirrorless fujifilm has no option to adjust exposure, and its
bracketing is only -+1 EV, while my Nikon dslr can adjust up to +-5, but
does not have bracketing. Can I compensate for this by manually
getting a lower or higher EV look by adjusting shutterspeed, iso and
aperture per shot? Would that entail the same result as -+2 EV setting
you are talking about that can still work in an HDRI stiching program?
– Can you still achieve 24EV hdri like yours from only using 5 EV
brackets? How do you check what level of EV is your final hdri?
– I don’t have a pano head or tripod that rotates, can I still do this just
by rotating my camera mounted to a steady tripod per angle shot?
Hi and thanks a lot for this detailed tutorial.
I followed it entirely, and while i was shooting anxiously looking at my wobbly weak tripod, it came out perfect, on a test at the office. I had to figure out how to use our pano head and find the nodal point, which maybe was worthing to be mention in your article.
I have a couple noobish questions tho : to me a raw picture is already 32bits/channel and contains a large dynamic range. And in the end, your .hdr is also 32bits. So how is it useful to shoot with exposure bracketing ? Does the .hdr contain more data than the source raw, while both are 32bits ? I guess it’s compressed with some more approximation in the intervaIs or something. I kinda get that a single shot cant capture the entire range of something as powerful as the sun.
Also, i’m not sure how much under and over exposed i should go. There you don’t get much over exposed for instance. Should i shoot from basically full black to full white to be at peace ?
Thanks.
Apologies for the approximative vocabulary, i’m not really into photography (and i’m not english native speaker either.)
Glad it helped :)
Raw images from cameras are not 32 bit. They’re usually either 12 or 14 bit. Even so, the measure of dynamic range is not as straight forward as how much space between exposure brackets there is, it’s also to do with the signal to noise ratio. Cameras also have an innate dynamic range (usually ~12 EVs), but the higher the iso (more noise) the lower the dynamic range (check out the dynamic range charts on dxomark: https://www.dxomark.com/Cameras/Nikon/D800E—Measurements ).
For over/under exposure, the most important thing is not to clip any light sources on your darkest shot. For the brightest shot, I normally shoot 1 or 2 stops brighter than what would be a “correctly” exposed image.
You are incredible tgankyout
Great tutorial Greg. I’d like to ask a few questions. Why do you go with real-HDR rather than Fusion HDR in PTGui? What’s wrong with a blended white balance, especially when the light can change around the scene. I’m also wondering why you stay light with the processing of the RAW shots before going through PTGui. After the pano is created, it is no longer RAW and you have less ability to adjust, no?
What color space do you use for export? I observed “AdobeRGB (1998)” in your export settings, is this a common guideline for HDRI primaries (just to be clear, I’m asking about colorimetry, not TRC or function transforms like gamma, linear, etc)
Hello greg! thanks for all this info, even a few years from when you posted, its the best of the best!
I will try this, i have two lens and wonder if you can suggest me what would you rather to use
I have a canon 80D with a 8mm fish eye and also have a 10mm wide normal len.
about the program, have you ever tried, auto pano pro? ive doing interior 360 with that, but not sure if for this kind of hdr would fit too
Definitely 10mm. Fisheye’s aren’t great for HDRIs in my opinion. I’ve explained why here: https://blog.hdrihaven.com/camera-gear-for-hdris/
Haven’t tried autopano.
So, will professionally textured models with PBR shaders look at though they ‘belong’ in the scene? I mean, apart from reflection, spec. highlights and shadows… should I expect the tones to be about right as long as the PBR is set up correctly?
I usually do this without the benefit of HDR domes in the modeler, and I always have SO much tweaking to do in postprocess to get them to composite… almost always requiring desaturation and CMYK curves… and there’s almost always things that I need to split out onto layers to correct. Life is just too short for all that : /
With this method, no.
I’ve written an updated tutorial that explains some of the color management issues and uses a different tool to merge the exposure brackets more accurately.
That way, in theory, and as long as the PBR maps were created properly and with appropriate care to color management, then yes things should look correct.