WIP Add-on: Manage Image Paths

blender-app_2016-03-15_10-51-01

So I started working on this add-on a while back during some freelance work, to help manage a messy production where images were being sourced from several different duplicate locations.

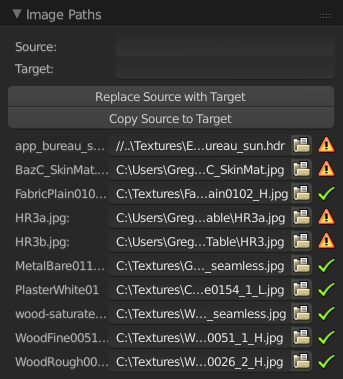
At first it was just a simple list of the images used in the blend file with the file paths displayed, but I soon wanted to be able to edit the paths directly. Then I needed to see which images actually existed, often when opening old projects I found the images had since been moved to a different location. Since many images were in the same location, it helped to add a sort of find & replace feature (the “Replace Source with Target” button) to batch-edit everything. I was also working with some images locally on my own hard drive and needed to copy them to the network drives so other computers could access them, which is what the “Copy Source to Target” button does.

When I started coding this add-on, I didn’t know about the External Data > Find missing files option that already exists in Blender, so I was manually fixing the file paths using this add-on.

Does anyone think this add-on would be useful?
What other features should I add to it?

Some ideas:

  • Display estimate of memory usage for each image
  • Remove duplicates (sometimes you have multiple “images” in blender that are actually the same file)
  • Show when an image has a fake user
  • Show what objects/materials use each image
  • Remove the Source/Target (find & replace) crap since Blender can do that by default

You can download the current version here, it’s still very much a work in progress and was thrown together in a hurry :) It might be quite slow to use, since it scans for the file locations on every redraw (a couple times for each time you move the mouse inside the properties editor), so keep the panel closed if you’re not using it.

Auto Tile Size addon updated (again)

Well when I started this blog, I would never have imagined it would turn into a code blog. I guess once I started doing shading and lighting more often at work, I lost interest in doing anything like that at home and turned to a new hobby.

Anyway, I fixed the issue with Blender Internal renderer getting stuck on tile sizes meant for Cycles, so BI now get’s it’s own tile size stored separately (defaulting at +-64). I also made sure no other renderer would get stuck using the same tile sizes by simply disabling it when the scene is not using BI or Cycles. And lastly a tiny UI tweak, hiding the target size behind a settings button since unless you really know what you’re doing you probably shouldn’t touch it anyway.

[Download Auto Tile Size Addon]

I also did a fair amount of testing to make sure my old assumptions were actually correct, and turns out they are:

tile_size_stats

I tested four very different scenes in Cycles using both GPU and CPU, with different resolutions and scene content.

As you can see, CPU likes small tiles and GPU likes bigger ones – whether or not the tiles are all the same size doesn’t seem to matter as much as I thought, although it does matter on the GPU if they are drastically different, such as very thin tiles on the edge, but that’s probably because the tile has a smaller area and not really anything to do with how square it is. Still, I stick with my original logic just to avoid these corner cases.

The story with Blender Internal is a little different. Here I only tested one scene at 1080p, either because I was too lazy to try some more, because others told me the best size already, or because the results of this one test were pretty conclusive. You choose. The point is that tile sizes in BI really don’t matter all that much. The main reason why the render gets slightly slower as the tile size decreases is because it has to look too see what’s inside that tile before rendering, and thus there’s a small overhead of render time for each tile, thus the more tiles there are the longer it takes.

Lastly, one of the reasons why the render takes longer in all three cases (Cycles GPU, CPU and BI) with large tiles is mostly because there are more tiles than there are threads available. For example 512×512 tiles in a 1024×1024 image means there’s only 4 cores of your CPU renderering, the rest are doing nothing at all. This might not matter too much with GPU rendering as you can see in the first two tests, since you only have 1 or 2 tiles rendering at once anyway.


(Re)Introducing Node Wrangler!

01

Just one of the new features, Viewer node for Cycles materials

Version 1.0 was, lets face it, not particularly useful. In fact the only thing I still use from it occasionally is that auto-arrangement feature. However, since the Zoom-Fit function inspired Henrik Aarnio to include it in trunk with the Alt+Home key, it wasn’t completely useless at all.

In fact, I’ve secretly been working on a whole bucket-full of new features!

Get the Node Wrangler!

I’ve made a page specifically for this addon, and I’ll continue to update it as I add more features. Here’s a summary of the features as they stand right now (but check the page for the very latest):

  • Viewer node for Cycles materials (Ctrl+Shift+Click)
  • Delete unused nodes (Alt+X)
  • UV Layer nodes – add an attribute node from a list of available UV maps with the name field already filled in (Shift+A > Input > UV Maps > [map name])
  • Switch the type of one or more nodes to a related type, like a different shader (Alt+S), keeping inputs and outputs connected
  • Swap the output connections of two nodes (Alt+Shift+S)
  • Reset the compositor backdrop image zoom and position (Z)
  • Frame the selected nodes (Shift+P)
  • Reload the images of all the image nodes in the current tree (Alt+R)
  • Quickly jump to the Image Editor and view the image of the selected node. Works for textures, movie clips, environment images, render layers, viewer nodes and masks.
  • Automatically arrange the selected nodes (or all of them) in a non-overlapping linear layout (Q)

The todo list is public on GitHub, as is the changelog which is updated automatically as I commit changes and new features.

That page I mentioned earlier has a lot more info on each feature, including a gif showing their usage.

Auto Tile Size Addon

Now before you start to think this is turning into some crazy coder blog, here’s an addon you might actually use!

2013-09-29_11-29-27

[Download] [Docs]

Tile sizes can be confusing and for some reason they actually make a difference in render speed! But why bother to figure it out when you can have a simple addon do it all for you?!
This addon takes care of that. Just enable it and you should never need to worry about tile sizes again!

It automatically calculates the best size when you change the resolution, or when you change from CPU to GPU and back, or accidentally change the tile size yourself! (although if you do want to set it manually, simply toggle the Auto Tile Size button)

We’ve all seen Andrew’s old post about how tile sizes affect render time, but its not quite as simple as this:

blender_tile_sizes_chart2(Update: I’ve done my own extensive tests since posting this)

In fact, it’s not always a good idea to stick to powers of 2 for dimensions (32, 64, 256…). I know! Blasphemy! But in this case there’s some logic behind it. Or at least some proof.

If you always stick to powers of 2 for your tile sizes, you’ll often have tiles that are not all the same size (on the edges of the image) since most resolutions simply don’t divide cleanly into powers of 2 (1920×1080 is a good example)

1080ptiles

This is a 1080p image divided into 256×256 blocks. As you can see, the tiles on the right and bottom are not the same size as the others. You might think this is illogical, but these tiles don’t take a proportionate amount of time to render relative to their size. For example, the tiles on the right are about half the size of the rest of the tiles, but they take more than half the time to render.

Thus, it’s important to always keep all your tiles the same size and as square as possible. Being a few pixels skew from powers of 2 is not as big a deal as having inconsistent tiles.

That’s where this main purpose of this addon comes in.

It figures out what’s the best tile size closest to a power of 2 of your choice. For example, the best size for 1080p that’s closest to 256×256 is 240×270, making 8×4 consistently sized tiles

1080ptiles_right

The addon stores the chosen target size separately for CPU and GPU in case you want to switch often, and defaults to 32 square tiles for CPU and 256 for GPU. Those are the best sizes in my experience, though sometimes GPU does better with 128 and CPU better with 64 – it all depends on the scene and the resolution.

[Download]

Update v2.0:

Removed ‘Set’ button – tile size is now automatically updated when changing target, render size or tile size (to manually change tile size, disable Auto Tile Size)
Improved accuracy for small tile sizes (result from 16 wasn’t so different from 32)

Update v2.2:

Now works for BI, hidden target option behind a “Show Advanced” type button

Code Navigation Addon

codenav[Download]

Although I know most serious coders prefer to use an external text editor, I’m still surprised nothing like this already existed.

It’s a simple overview of all the classes and functions in the current text file, with a button to jump to the start of that code block. I’ve also included a ‘Hide Built-in’ toggle to hide all the execute, poll, invoke, draw and other built-in functions that are really common and clog up the UI

zhBmKK6

Unfortunately, there’s currently no way to actually set the current line of the text editor with any python command, so this is a bit of a hack using the Find operator. I’ve tried to handle any kind of bugs that could pop up because of this (especially where functions have the same name (eg: draw, execute…)), but if you run into anything, let me know and I’ll see what I can do about it.

And in related news:

Nathan Letwory hacked a sidebar bird view together last night (still working on it). At this rate, we’ll have Sublime functionality in no time! :)