New Custom Motion Blur Curves

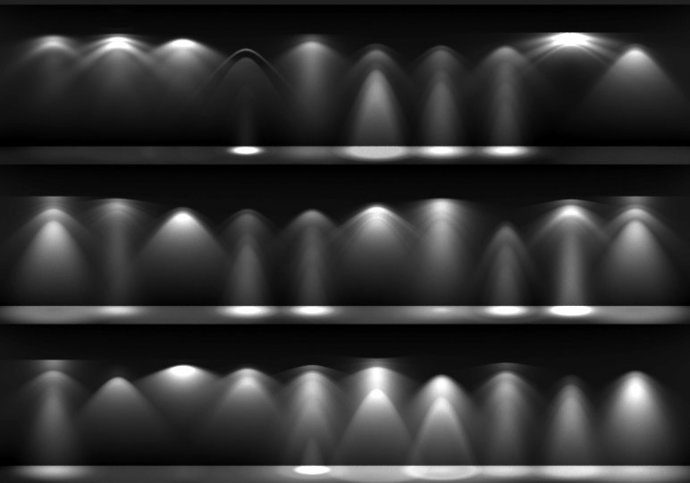
A couple of weeks ago, Sergey implemented the ability to control the exact appearance of motion blur streaks by using a simple curve widget in the render settings:

moblur_curves_drawFrom the initial patch:

Previously shutter was instantly opening, staying opened for the shutter time period of time and then instantly closing. This isn’t quite how real cameras are working, where shutter is opening with some curve. Now it is possible to define user curve for how much shutter is opened across the sampling period of time.

This could be used for example to make motion blur trails softer.

Shutter curve now can be controlled using curve mapping widget in the motion blur panel in Render buttons. Only mapping from 0..1 by x axis are allowed, Y values will be normalized to fill in 0..1 space as well automatically.

Y values of 0 means fully closed shutter, Y values of 1 means fully opened shutter.

Native IES Support on its Way

Source

There’s been an add-on available for quite some time that allows IES light profiles to be used in Cycles, but recently Lukas Stockner (the guy who brought you portal lamps) has been working on a patch that implements IES profiles natively (without requiring an add-on), which potentially means faster renders and more accurate results.

See D1543:

This patch adds support for IES files, a file format that is commonly used to store the directional intensity distribution of light sources.
The new “IES Light” node is supposed to be plugged into the Strength input of the Emission node of the lamp.

[…]

The user interface of the node is similar to the script node, the user can either select an internal Text or load a file. […]

The local coordinate system of the lamp is used, so that the direction of the light can be changed. For UI reasons, it’s usually best to add an area light,
rotate it and then change its type, since especially the point light does not immediately show its local coordinate system in the viewport.

For now you’ll have to wait for the patch to be approved and added into master before you can try it out, unless you’re capable of applying the patch and building blender locally (which I failed at miserably).

Cache BVH Is No More

BVH caching was originally added in 2.62 in an effort to bypass the (at the time) slow process of building the BVH (Bounding Volume Heirarchy, which is used speed up ray tracing). It would basically store the BVH on your hard drive so that the next time you render the scene (assuming no geometry had changed), it would just read it from the hard drive instead of rebuilding it.

But after just two more releases (2.64), BVH building was sped up dramatically by using all the CPU cores instead of just one. From then on, it was usually quicker to rebuild the BVH for each render than to read the cache from your hard drive, particularly in the case of animations where the BVH changes for each frame and has to be rebuilt anyway.

And thus, that little Cache BVH checkbox became obsolete.

To add fuel to the fire, the BVH cache was never actually cleared automatically (on Windows at least), leaving you with many gigabytes of cached data that you had to delete yourself. Just look in C:\Users\<you>\AppData\Roaming\Blender Foundation\Blender\2.75\cache to see what I mean. Mine was 170 GB before I realized what was going on.

So finally, Thomas has removed the BVH cache feature:

Cycles: Remove the BVH cache feature. […] The BVH cache was added before we had a multi-threaded BVH build, and a lot of other optimizations were done since then, which makes this not useful anymore.

Fix T46162.

Finally, we are free from the clutches of accidentally slow renders and congested hard drives.

Taking the Plunge

Some of you might have noticed that I’ve been working for Blender Guru for the last few months. It started back in February when Andrew asked me to write a single article for him, and soon became a more permanent job. My task was to produce articles and short tutorials for the site, including management of other contributors.

Now I realize that for most beginners, and probably some of the more professional Blender artists too, working for the Andrew Price sounds like the perfect dream job. You get to stay at home all day and make awesome crap with an audience of thousands of people, right?

Perhaps… but it’s not for me.

It’s taken me 6 months to realize this, but I’ll never be satisfied working full-time for someone else. At least not permanently.

My freedom and independence is important to me, so rather than devote a good portion of my youth to a job that I don’t truly enjoy, I’ve resigned from Blender Guru.

But… what now?

Continue Reading…

Making an optimized GIF in Gimp

I googled a bit, and was surprised that I couldn’t find a good tutorial on how to convert an image sequence to an optimized GIF using Gimp. Sure, you can just export a bunch of layers as a .gif file, but it’s going to be pretty huge.

19.4 MB  vs  0.5 MB

In fact in this example, the optimized gif is 2.5% the size of the unoptimized one. That’s 40 times smaller.

Overview

So there are a few things you need to do to bring the file size down. I learnt this somewhere online for sure, but I can’t remember where or find it on teh googles.

The process is basically this:

  • Import sequence as layers
  • Generate a palette (gif’s only support 256 colours)
  • Optimize
  • Save

Continue Reading…