HDRIs are everywhere these days. If you’ve got a half-decent camera, a tripod and some software you can even make them yourself.
But just like creating art in Blender, being able to do it at all is not the same as being able to do it well.
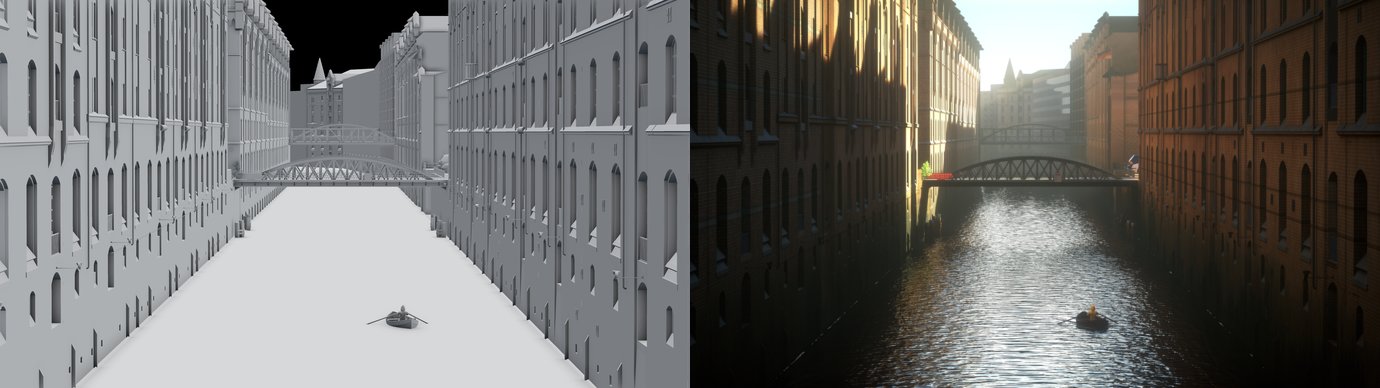
So, after I created my first crappy HDRI and discovered how challenging it could be, I decided to embark on a quest. I wanted to create the perfect high dynamic range environment map that would give you perfectly accurate and realistic lighting as if you had teleported your CG scene to the actual location of the photo itself.
In truth, this is an unending quest, but I’ve made some fair progress over the years. So without further ado, let me explain…
What Makes a Good HDRI
Just like art, the quality of an HDRI can be a subjective thing, but I think we can all agree that there are a few fundamental attributes that define (although not exclusively) how useful or accurate an HDRI is.
Dynamic Range
Let’s begin with what is, to me, the most important aspect of any HDR image that you intend to use for lighting.
Dynamic range is an indication of the contrast in an image. Typically you’ll see something like “12 EVs” which means that when they took the photos, for each camera angle they captured multiple photos at different exposures that encompassed a 12 EV range.
But what the heck is an EV in the first place? Well it stands for Exposure Value. As you might know, exposure refers to the amount of time that the camera shutter is open, and thus the amount of light that gets captured on the sensor. But an exposure value (in terms of HDRIs) is a measurement of the range of exposure. So if you capture two images, one twice as bright as the other (double the exposure time), and merge them into a single image, that new image would have a dynamic range of one EV.
(Side note for you techies… This is a pretty silly way to measure it in my opinion, because a single shot already encompasses a certain range of brightness (dynamic range), and depending on the camera you use this can vary between 10 and 14 EVs. But it seems to be the norm for HDRI dynamic range measurements to ignore this fact and just include the range between the shutter speeds.)
Each EV means double the lighting information, so a dynamic range of 2 EVs means you captured three photos, each one doubling the last exposure time. You might start with an exposure of 1/16th of a second, then do 1/8th and then 1/4th.

Side note: Cameras can’t do 1/16th exposures,
instead they do 1/15th because they want to make our lives difficult
But most environments have an extremely wide range of brightness. The filament of a light bulb might only be properly exposed (not over-bright or “blown out”) at 1/4000th of a second, and in the same view you can see the corner of the room cast in shadow, which might require an entire second of exposure before it’s bright enough to see clearly.
So to capture all of this you would shoot 5 photos with a 3 EV gap between each one. The exposure times would be 1/4000th, 1/500th, 1/60th, 1/8th of a second and finally 1 whole second.


Both the light bulb and the darkest shadows are properly exposed
You might think that 5 photos with 3 EVs between them would mean a dynamic range of 15 EVs (5×3), but in fact there are only 4 gaps between the 5 photos. which means the dynamic range is really 12 EVs (4×3).
This is all quite easy to do, in fact the camera does all the work of calculating the right values and capturing them in sequence, all you have to do is point and shoot.
The challenge comes in when the range of brightness you need to capture is so high that it’s difficult to get it all in one go. For example, any time you need to capture the sun. The sun is so bright that even 1/4000th of a second is too long and captures too much light. And usually the fastest any typical commercially available camera will go is 1/4000 or 1/8000 (which is still not enough).
Since this is a difficult problem to solve, most folks just don’t bother at all and thus we’re left with HDRIs that do not contain the entire brightness of the sun.
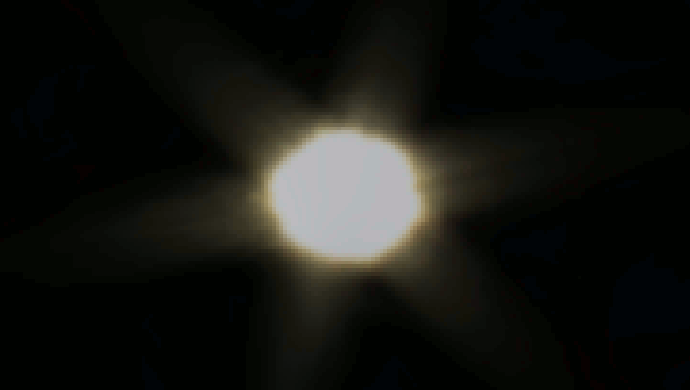
Flashing red area is a solid colour, indicating the brightness is clipped and therefore incorrect.
But it’s not an impossible problem. You can buy Neutral Density filters, which essentially block a certain amount of light, allowing you to shoot darker photos. Thus you can shoot a larger exposure range and, with a strong enough filter, capture the entire brightness of the sun.
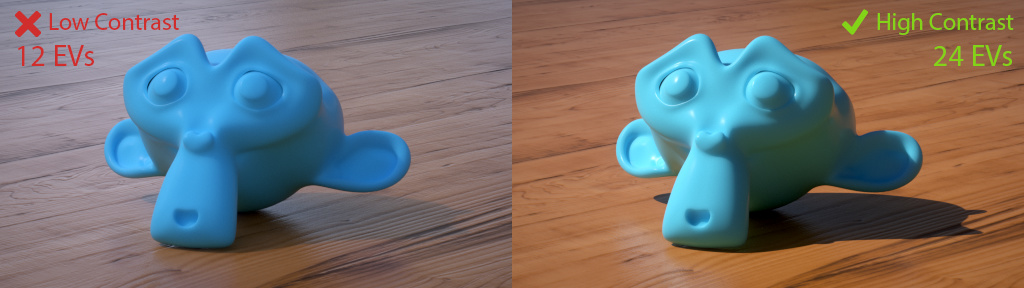
My point is this: It’s quite difficult to capture the whole dynamic range of a scene in many cases. For an interior shot, 12 EVs is usually enough, but for an outdoor shot where the sun is visible, you might need around 22 EVs to capture everything depending on the time of day and the weather.
If an HDRI does not contain the complete dynamic range possible for that particular shot, the lighting it creates in your 3D scene will be incorrect.
Resolution
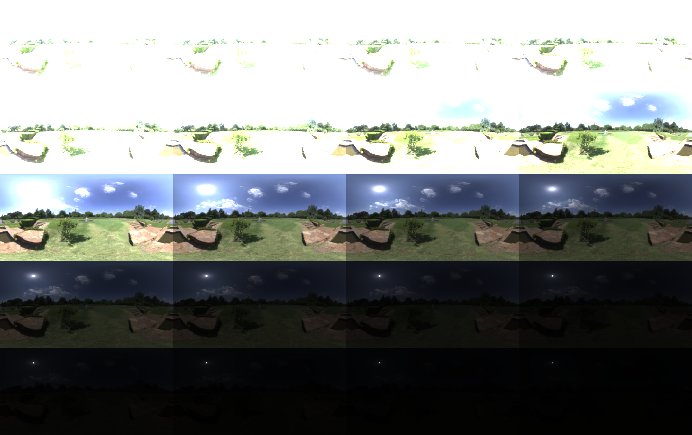
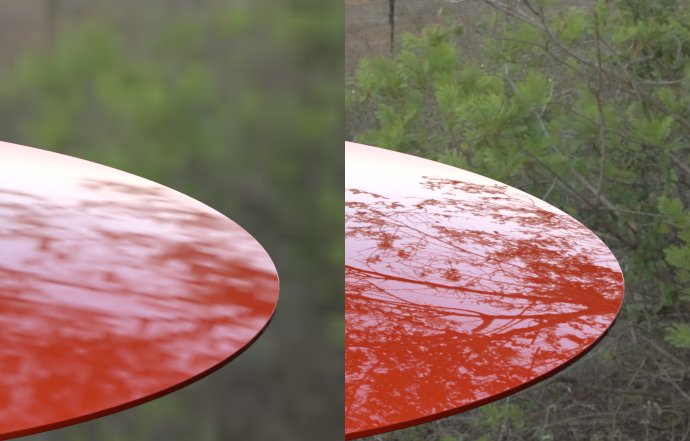
If you only care about the lighting that an HDRI gives you, resolution isn’t actually all that important. A 2000×1000 HDRI will give you lighting almost identical to a 16000×8000 one. If you go smaller than 2k, you might start to see blurry shadows, but even that is not usually a big deal.
But lighting isn’t everything, and in many cases you’ll have very shiny surfaces that reflect your HDRI. Depending on the focal length of the camera and how flat the surface is, I find an HDRI needs to be at least 4000×2000 in order to get crispy reflections on most surfaces.
Additionally, if the HDRI is actually visible in the background (e.g. the sky), resolution is obviously very important as you don’t want any of that ugly pixelation nonsense distracting the viewer from your awesome artwork.

1k vs 16k HDRI in a 1080p render, 35mm focal length
100% crop
No surprises there.
Now let’s say you’re rendering an image in Blender and want to know what the minimum resolution of the HDRI you’ll use in the background should be…
The horizontal field of view of the 35mm (default) camera in Blender is about 49º, which is about 14% of 360º. If the resolution of the render is 1920×1080, then the HDRI’s horizontal resolution needs to be at least 1920*(100/14), which is just shy of 14000 pixels.
But of course you may want to zoom in a little, so I’d say that 14000×7000 is the bare minimum for any HDRI, though you should rather try and find something bigger.
The problem with large HDRIs is the amount of memory they consume. An HDRI is stored in memory as a 32-bit image, meaning each channel for each pixel needs 32 bits of memory during render time. This means that a 14000×7000 HDRI will consume about 1 GB of RAM. If you’re rendering on your CPU that’s not such a big deal, but if you’re rendering on your GPU, RAM is suddenly much more precious. Add to that the geometry of your scene and all the other textures you’re using, and chances are your GPU simply doesn’t have enough memory and you won’t be able to render with it.
The formula for working out how much memory an image will use is: (((bit_depth*number_of_channels*x_res*y_res)/8)/1024)/1024 to get it in megabytes.
Aesthetics
Finally we reach the matter of beauty and taste.
There are certain things like giant stitching artifacts, lens flares, chromatic aberration, wobbly horizons and the shadows of cameramen that we can probably all agree are bad things, but what about the beauty of the lighting that an HDRI gives? Does it even matter? Surely someone can find a use for even the most boring overcast sky?
I suppose.
But as an artist, it matters to me. I don’t want to make boring things, even if they are useful to someone way out there in the outer reaches of the internets. I want to make things that are pretty, things that can turn your grey, lifeless model into a beautifully presented work of art.
To me, lighting is the single most important part of the CG pipeline because it’s what creates mood and emotion in an image. Obviously you couldn’t have an image at all without modeling, texturing, composition and all the rest, but lighting is responsible for the sole purpose of why we create art in the first place: to express our thoughts and feelings, to put our emotions into something that will outlast us.
Without good lighting, all the art we could ever make would be little more than a form of factual essay without any adjectives.
OK, maybe I’m being a bit melodramatic, but you get the idea. In my opinion at least, a good HDRI is one that makes all the rest of your hard work look good.
The Right Way to use an HDRI
So there have been many tutorials and articles that claim to show you the proper way to do HDR lighting in Blender. I’ve done some incorrect ones myself in fact.
But to be honest, there’s really no special trick, and practically no way to guarantee that your lighting will be 100% accurate to real life due to the simple fact that colour management is a bitch.
So in the case that an HDRI was shot with the full dynamic range possible (including the full brightness of the sun), then the most correct way to use such an HDRI is simply this:
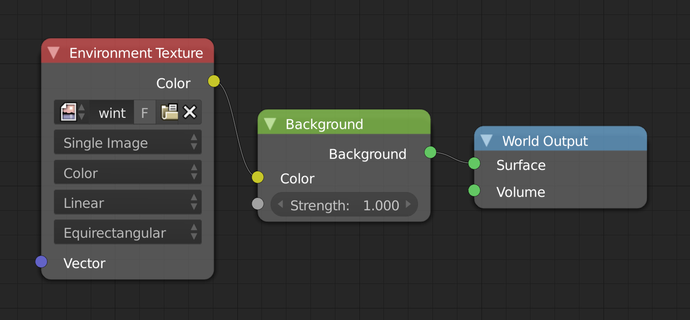
Yes, that’s all. No fancy node setups or expensive plugins. What you have right there is the most accurate lighting you could ever get, and it takes just 15 seconds to set up.
In the past I have said that you’re supposed to plug the HDRI into the strength input of the background shader too, but that is wrong. The only reason you might want to do that is if your HDRI’s dynamic range is not high enough and the sun’s (or any other light source’s) brightness is actually clipped. Sadly, this is true for most HDRIs out there, even the ones you have to pay for.
Plugging it into the strength input is basically the same as multiplying it by itself, which is like increasing the contrast (the brighter pixels get brighter, and the darker pixels get darker). If the HDRI does contain the full dynamic range, then doing any sort of manipulation to it will potentially ruin the accuracy.
Whew, that was a long one. Thanks for sticking with me though, I hope I’ve cleared up a few myths and misconceptions about HDRIs along the way.
If you’d like to see some examples of proper high quality HDRIs, take a look at HDRI Haven, my new dedicated home for all the HDRIs I make. There’s lots of free stuff there, just take a look around :)
In any case, let me know what you think in the comments below. If you don’t agree with something I said, please shout at me and put me in my place :P
Great article, thanks for taking the time!
WHy your nodes UI looks differents?
It’s just a theme (based off the Amaranth one)
Wow so fast answer :D Thank you
Also found some nice HDRI’s at hdriprobes.com
hi i cant get sharp shadows from the hdri, what could be the problem?
What renderer and which HDRI?
Awesome work!
Hope you keep doing this. First time I think it’a worth to patreon someone.
Cheers from Brazil :)
Had a couple questions if you get time Greg….It’s been a couple years since you posted this, what would you change today if you were to update this article? Also, what gear do you currently use for capturing HDRIs? Do most newer DSLRs today already have advanced bracketing? (since Magic Lantern isn’t compatible with them for ex. Canon Mk4 or Panasonic Gh5)
Damn has it been 3 years already?!
I don’t think I’d change anything here. If I did, I would just change it ;) I often refer people to this page to try and explain what difference dynamic range and resolution actually makes in practice, so if there was anything I thought was wrong or outdated, I’d just update it.
I still use my old 600D, still saving up for something fancier…
When it comes to firmware, camera companies all seem to be glued to the past, stubbornly sticking to the “it it aint broke don’t fix it” model. As far as I know, only the higher end canon cameras can do more than 5×2 bracketing natively, and even then the usability of it seems really painful (you select the middle exposure, and then do up to 9 shots in both directions). The Sony a7 series firmware is based on android, which opens up the possibility for custom apps to do whatever you want, but A) the UI for using these apps it very clunky, and B) no one has actually written a functional exposure bracketing app (that I know of). For anything else, you have to use a Promote Control device for custom bracketing.
I read what you told about good HDRi so I decided to do a switch with a greater than in a mix with 1 entry good HDRi and strengh and other one where you can deal with less good HDri ^^. so a compromise…
I know how much time & effort goes into these, and can’t thank you enough. Your work is awesome and certainly helping a great many artists like myself. I just signed up to provide monthly support! :)
Thanks Jeff!
Greg, you and your friend at TextureHaven do an amazing job. I’ve been working with DAZ Studio for about a year and have shied away from HDRI because they usually cost an arm and a leg, and the free ones are usually low on quality or rather clipped so they can put their logo all over it. I see none of that. No cuts, no lines, no ads. Thank you so much.
Hi!
I know this site through a project. I do not understand much about your project. However, if you need real estate photo editing, please contact me
https://www.behance.net/anhvtd358
very great info. I found the way to have setting on HDRis, without touching the color on the objects of the scene as you mention. https://www.youtube.com/watch?v=J-qtCJEvGQc&t=249s
Hi, you know how is the most correct way to use these HDRI in Vray 3ds Max. By the way, they are great, thanks
I cant get reflections of the reflections on vray rt
Do you have suggestions for correcting exposure in a downloaded image? For example what values do you see across the sun? The sky clear or overcast? Night time shots, what sort of values from lamps? etc.
I’ve downloaded many images and spent many megabytes of internet traffic, to end up with washed out renders. I really like the background and want to use it, but it’s practically useless without correct exposure.
How do you validate a correct exposure?
It varies depending on the weather and time of day, but you can use all of these as a baseline to compare: https://hdrihaven.com/hdris/category/?o=popular&s=sun
Hello Greg! It’s an interesting post! Maybe you can help me about the dynamic range of Hdri’s I’m creating. How do you measure the correct dynamic range of an Hdri you create? ex. 24EV how is this value measured? (I’m using PTgui for the stitching and I need to know the EV range of the final 32bit EXR file created…) Thanks for your help! All the best from Italy. Rob
It’s not ideal, but the most common way is to simply calculate the difference between the brightest and darkest exposure brackets. I have a little tool for this here: https://hdrihaven.com/contrib/calc-ev-difference.php
Didn’t realize this until the last paragraph, I searched how to properly use HDRI’s and the site I downloaded them from was the same as hosts this article. Thanks for the HDRI’s and advice, I see so many people who steal from sites like yours and put them behind a paywall, thanks man, appreciate your work.