Batch Renamer

batch_rename_screenshot2

batch_rename_screenshot

[Download]

I’ve had this one for a while now, but it’s been a mess of slightly working code until recently – but now I like to think it’s unbreakable! (yes, that’s a challenge)

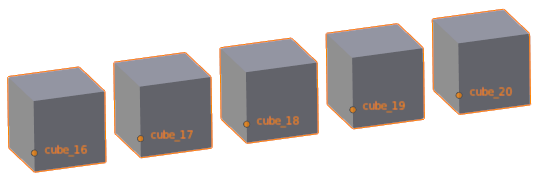
It’s a simple renaming tool meant for a bunch of similar objects. All it will do is rename them to something consistent with incrementing numbers (name_01, name_02, name_03…)

You have control over the starting number and the sorting of the objects, and that’s about all you need really. I have considered doing something more complicated with bones and left/right versions and whatever, but I seldom need such a thing anyway.

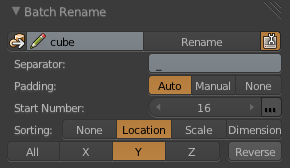
Here’s an explanation of each item in the interface:

separator

Get base-name: (first icon-button at the top left) Sets the base-name to that of the active object (stripping it of any numbering it already has)

Base-name: What to name the objects as (base_name_01, base_name_02….)

Rename: The big button to do the renaming

Advanced: Show all the options and controls

Separator: How to separate the base name and the numbers (name_01, name.01, name-01 or any separator of your choice, doesn’t have to be a single letter)

Padding: The number of digits in the numbering, adding trailing zeros to fill the space (name_01, name_001 or name_0001…) – Auto mode will figure out how many objects are selected and thus how much padding is needed. Manual mode will allow you to choose how much padding you want, but will increase it automatically if it’s not enough. None mode will not add any trailing zeroes.

Start Number: Begin naming the objects with number starting from here.

Continued Numbering: (ellipse icon just to the right of the start number) Increase the start number every time you rename objects such that you can carry on numbering from where you left off last. I suggest you use Manual padding for this one, since if the total number of objects renamed goes above the next level of padding (above 100 for example) then there will be inconsistent padding (name_05, name_89, name_134 – different amount of digits)

Sorting: How to sort the objects, by location, scale or dimensions. Dimensions is useful to use as a “visual” scale – think 1000 rocks of different sizes but all with 1.0 scaling.

Sorting Axis: In which direction to sort them – on one of the axes or on the average of them (‘All’)?

Reverse: Flip the order of the sorting, E.g: go right-to-left instead of left-to-right

separator

And that’s it!

Please rip it to shreds. Find any bugs, suggest any features. And if you feel like it, I’d appreciate a code-review too.

Volume Test

volume_spot
volume_spot (1)
volume_render

A long time ago in a version far far away, an anonymous user named ‘storm’ wrote a patch for volumetric rendering in cycles.

Recently, Thomas and Stuart (them crazy coder guys) made some changes and cleanups to the code – meaning it’s possible to download a patch, compile Blender and render some volumes!

Don’t get too excited just yet though, in it’s current state there’s no way to give it any fancy voxel textures from the smoke simulator or anything – all in due time!

volume_render_1

Images courtesy of Thomas Dinges, because I’m too lazy to compile it myself

SSS… SSSSSSSSSSSSSSS…

I just thought I’d pop by to break the radio-silence and show some epic skin stuff that’s been happening lately.

A couple days ago, Brecht surprised us all by adding two additional falloff options for the SSS shader, as well as giving it bump/normal map capabilities and texture blurring, and Thomas also finished his work on SSS render passes (sneak a peak at the 2.69 release notes while we make them here)

The video above is an interesting combination of talent. Shortly after Brecht originally added the SSS shader, Matt Heimlich (a co-cycles module owner) created a monster node setup that mimics Arnold renderer’s renown skin shader abilities. A little while ago, Kent Trammell tried out Matt’s shader setup and that’s the video above :)

So I think it’s safe to say that the only major features missing from Cycles now is volumetrics (clouds and stuff). Sure there’s some other nice-to-have stuff, but if you think about it, nothing else is really a major feature (who cares about baking anyways)

DingTo Rocks!

I’ve been meaning to write this post since I started this blog, but my laziness isn’t a bad thing! (this time) Due to my procrastination, I now have more things to write about!

DingTo (Thomas Dinges) is one of the developers focused mainly on Cycles. He’s busy doing GSoC and has added a whole handful of great new features. Here’s a couple of my favorites:

Wavelength and Blackbody nodes

These two nodes allow you to input physical values to get a colour. The wavelength is the full spectrum of colours. Plug a gradient texture into it with a few math nodes to get the 0-1 range to a 380-780 range and you get a physically accurate rainbow!

wavelength


The Blackbody node on the other hand allows you to input a colour temperature to get the right RGB colour. This is useful if you know the exact colour temperature of a specific light bulb, or get that lame looking candle of yours to look right!

Separate/Combine HSV

I’ve been asking for this one for a damn long time ;) I asked DingTo for it at least a couple times and ranted about the lack of it at least once in #blendercoders.

Before all we had was Separate/Combine RGB, but many artists like myself don’t work in RGB much and can visualize colours much better as Hue (what colour), Saturation (the richness of the colour) and Value (brightness).

Why do we need this? Basically to make easier colour adjustments to textures. I generally use nodes as a sort of dynamic photoshopping in three dimensions, getting a bunch of unrelated textures (like rocks, grass and baked occlusion) to create a completely different material (like metal).

Non-Progressive Integrator for GPU

I’ve seen some good results from the non-progressive integrator, but since it was CPU-only I never really took it seriously since CPU rendering is too slow to work with.

Basically, instead of having one control for the number of samples to do, it gives you the ability to choose how many of what kind of sample to do for each iteration. So you can choose to have more diffuse samples than glossy since it usually takes less than 10 glossy samples to clean sharp reflections, but diffuse needs a lot more.

So depending on your scene and your setup, you’ll get cleaner renders in shorter time.

I haven’t tried it out fully yet, so I’ll leave any further elaboration to another post.

Ray Depth

The Ray Depth output of the Light Path node basically gives you control over what happens on each light bounce. You can use it on lamps to control the number of light bounces per lamp, or only have a single light bounce for transmission rays to eliminate that kind of caustics (though keeping reflection caustics). Or you could use it in materials, making a glossy material act like a diffuse one after a couple bounces so that it doesn’t give any fireflies but still adds a little colour bleeding. Use your imagination :)

The only downfall is that this is purely visual and doesn’t actually reduce render time at all. It might reduce some noise in the case of caustics, but it still calculates the same number of bounces for each ray even if you have the emission shader become a holdout shader after a few bounces. So use it for artistic purposes, not to optimize render time (unless in the caustics case).

Sky Model

sky

Added just yesterday, this is a much more realistic algorithm for the sky texture node, especially when it comes to sunsets.

All the features except the Sky Model are already in trunk, so get a build from graphicall.org or builder.blender.org  to use them :)

Here’s a full list of all DingTo’s GSoC awesomeness:
http://wiki.blender.org/index.php/User:DingTo/GSoC_2013/Changelog

Cycles changes license to accommodate for other 3D software

Good news posted today on the Blender Development Blog, the code for Cycles has been released with an Apache 2.0 license.

What does it mean?
Well basically it allows other 3D programs to use Cycles for rendering.

Why do we care?
More people using it means more potential developer involvement, which means more features, and more artists to provide professional feedback.

What will change?
Nothing bad.

“Note that Blender Foundation and Blender Institute remain committed to further developing Cycles as a render engine for Blender. We welcome other developers to integrate it in other applications, and especially to get involved with the Cycles development team at blender.org.” –src

Cycles will still remain as it is now, be developed just the same by the Blender devs, and probably gain additional improvements anyone makes for it outside of Blender context.

Read the full story on the Development blog:
http://code.blender.org/index.php/2013/08/cycles-render-engine-released-with-permissive-license/