Woooo! I have to say I’ve been waiting for this for years!
It’s basically the same as dirty vertex colors, but on the final geometry (after modifiers) and without all the hassle of adding it to every single mesh.
The commit from Sergey [227a9407]:
Woooo! I have to say I’ve been waiting for this for years!
It’s basically the same as dirty vertex colors, but on the final geometry (after modifiers) and without all the hassle of adding it to every single mesh.
The commit from Sergey [227a9407]:
Sergey Sharybin added sphere and tube mapping options to the image node yesterday:
[12ccac6] Cycles: Support sphere mapping for the image texture
[dda3554] Cycles: Support tube projection for images
Just the same mapping types we’ve had in BI for years ;)
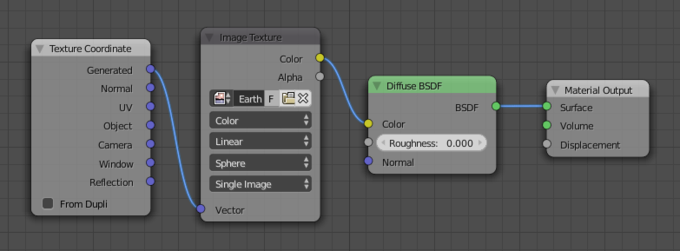
Sphere mapping allows us, for example, to painlessly map a texture of the Earth onto a sphere without needing to do any UV mapping.

Simply change the projection method on you image node from Flat to Sphere or Tube, and probably you’ll want to use generated coordinates.
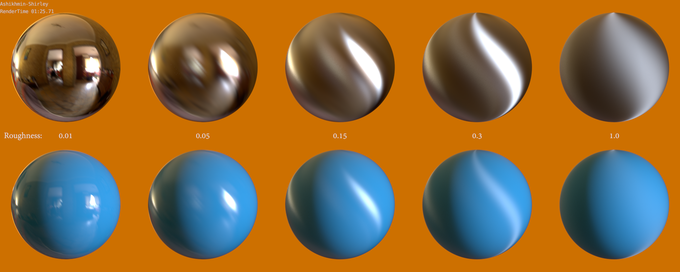
I know 2.71 hasn’t even officially been released yet, but in 2.72, there’ll be a new distribution model for glossy shaders, Ashikhmin-Shirley, and all three models have now been made available for the anisotropy shader too. I played around a bit and came up with this little comparison:
(Best to open each of these in a new tab to compare them easier)
Ashikhmin-Shirley:
 Continue Reading…
Most of you have probably downloaded the 2.70 RC by now and probably started playing around with volumetrics in cycles. Immediately you probably noticed how slow it renders, although that was probably expected. Here are the results of a little test I did to find out exactly how to speed up volume rendering for the world up so that it’s actually usable.
The very first and foremost thing you need to know about volumetrics is the difference between Homogeneous and Heterogeneous volumes. Basically, a volume where the density is driven by some texture is a heterogeneous one, and a volume with consistent density is a homogeneous one. The difference in render time and quality is… well, quite drastic:
Yep, you read that right. Under 3 minutes for homogeneous volume and over an hour for a quarter of the samples in the heterogeneous volume. The heterogeneous render seems to have a less dense volume, and I guess it does since it was driven by a noise texture where I couldn’t easily control the density and honestly couldn’t be bothered to wait long enough to give it a decent try. Continue Reading…
Being an artist member of the Cycles module of Blender, every release I get to make pretty pictures to illustrate the new features in the release notes. This time was of course volumetrics.
For now, getting data from smoke simulations is not possible*, so the next most obvious demonstration are some epic light beams.
I tried a few things, but most of them were pretty abstract and could probably be done with only some compositing.
So in the end, I decided to make some kind of epic mountain complete with surreal god rays casting huge shadows over an ominous landscape.
Starting with some geometry generated by the one and only ANT Landscape addon, I added a displacement modifier using a Voronoi F2-F1 cloud texture to give it a bit of detail:
The material for the terrain is fairly simple too – just some rock textures mixed together to get the colour and detail I want, and some normal+height mask to put some greenery on the plane below the mountain (though you can barely see this in the render)
The world material is a simple Volume Scatter shader with a white colour, 0.4 density and 0.0 anisotropy. 0.4 for density is actually really high for the world shader, but I used an extremely bright light to punch through it.
The light setup is where it gets interesting:
It’s a single spot lamp really, but I wasn’t happy with the falloff from the edge of the light’s influence to the center, so I placed a semi-transparent plane in front of the light that allowed me to create exactly the falloff I want, and also to create an elliptical shape instead of the normal circular shape of spot lamps. This really allowed me to focus the light on a single point and create very dramatic shadows in the world volume itself. Without doing this, too much light was scattering in front and behind the mountain, making hard to notice that the mountain was casting a shadow at all.
Finally, the light ray was pretty boring and quite obviously came from a plain spot lamp, so I added a noise texture to the plane in front of the lamp. This breaks it up and creates all those fancy rays of light instead of just one.
The noise is pumped through that ramp just to give the light a bit of colour variance. I knew I was going to desaturate it heavily in the compositor later, but I still wanted some subtle variance.
A little bit of compositing later and we’re done :)
One thing I noticed was that volume rendering is surprisingly fast. Doing the final render only took about an hour on my 2600K 2.4GHz i7 cpu, which isn’t much slower than your average cycles render. Sure there’s only one light and it is an homogeneous volume, but I was really expecting much worse.
Great work from Brecht and the rest of the gang as usual :) One step closer to being a true production-ready renderer.
* Though I’ve yet to try this addon.
This adds an option in the Volume Sampling panel, which helps rendering lamps inside or near volumes with less noise. It can also increase noise though and needs improvements to support MIS and heterogeneous volumes, but since it’s useful in some cases already (especially world volumes) it’s there now.
Based on the code in the old branch by Stuart, with modifications by Thomas and Brecht.
-Brecht, commit
Thomas rendered the image above with just 10 samples! Cycles isn’t as slow as you thought ;)