How to Create Your Own HDR Environment Maps

Update: I’ve written a new HDRI tutorial that covers some more advanced stuff here:
http://blog.hdrihaven.com/how-to-create-high-quality-hdri/
It’s aimed a bit more to professional HDRI creators and assumes you already know the basics, so if you’re completely new to HDRIs you should read this post first :)
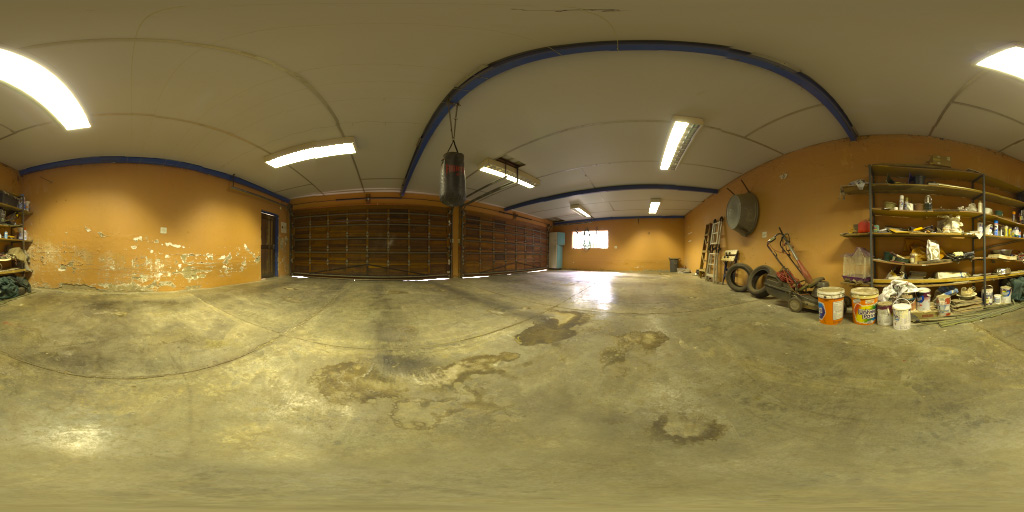
garage

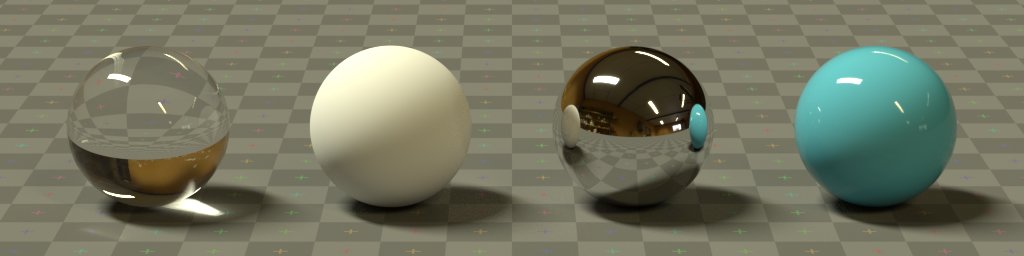
A simple 3D scene that was lit using only the HDRI above (no additional lamps)

There is no easier or quicker way to light a CG scene than to use an HDRI. They are essentially snapshots of the real world that contain exquisitely detailed lighting information, which can transport your bland CG objects into realistic virtual environments.

Not only do they provide accurate lighting, but they can be seen in the background and in reflections, which makes them all the more immersive.

Creating a high quality HDRI from scratch is quite a complicated task that requires very specific equipment and a meticulous workflow. One mistake like using the wrong focal length or choosing a slow shutter speed can mean all your time has been wasted and you’ll have to start all over again.

I’ve been making HDRIs for a couple of years now, so I hope I can save you some time and experimentation. This is by no means the only way to make an HDRI, but it is a good introduction to the process.

By the end of this tutorial, you’ll have made your very own 360º HDR environment map that can be used to light a 3D scene.

Buckle your seat belts boys and girls, because this is gonna be a long one!

Continue Reading…

Making an optimized GIF in Gimp

I googled a bit, and was surprised that I couldn’t find a good tutorial on how to convert an image sequence to an optimized GIF using Gimp. Sure, you can just export a bunch of layers as a .gif file, but it’s going to be pretty huge.

19.4 MB  vs  0.5 MB

In fact in this example, the optimized gif is 2.5% the size of the unoptimized one. That’s 40 times smaller.

Overview

So there are a few things you need to do to bring the file size down. I learnt this somewhere online for sure, but I can’t remember where or find it on teh googles.

The process is basically this:

  • Import sequence as layers
  • Generate a palette (gif’s only support 256 colours)
  • Optimize
  • Save

Continue Reading…

Staggered Texture Mapping

One useful feature that a lot of other 3d apps have is something called ‘Staggered’ tiling. Instead of just tiling an image normally, it offsets every second row so that it’s not quite as obviously tiled. The left image above is regular tiling, and the right one is staggered.

So as to be a true fanboy, here’s how to acheive the same thing with nodes in Cycles (and can probably apply to BI as well)

A short explaination: Remember that UVs can be manipulated as colours? Once you’re used to that, the possibilities are endless. This node setup takes the red channel (the X axis), rounds it to whole numbers so that there are incrementing solid blocks of colour for every repeated UV space, and then adds that to the green channel (the Y axis) so that it’s offset, staggered.

If you want to stagger it the other way, it’s just a matter of swapping the R and G channels:

Camera Stabilisation with FFmpeg


Now before you shout me down with your “Blender can do that!” patriotism, let me first explain how you would do it in Blender:

  • Open Blender, Import the footage into the Movie Clip Editor
  • Track a few markers (which might be tricky, since your footage is so shaky)
  • Enable 2D stabilization and assign those markers
  • Enable Display Stabilization and be shocked at how cropped your video is now
  • Spend the next half hour tweaking settings until you’ve got an acceptable video
  • And finally render it out (without forgetting the audio!) to a format (you hope) your TV or YouTube will understand using a limited number of encoding controls.

So that works, sure, but if you’re looking for something really quick and easy that gives you a huge amount of optional control over the output file, give our friend FFmpeg a try! Continue Reading…

World Volume Tests

Most of you have probably downloaded the 2.70 RC by now and probably started playing around with volumetrics in cycles. Immediately you probably noticed how slow it renders, although that was probably expected. Here are the results of a little test I did to find out exactly how to speed up volume rendering for the world up so that it’s actually usable.

The very first and foremost thing you need to know about volumetrics is the difference between Homogeneous and Heterogeneous volumes. Basically, a volume where the density is driven by some texture is a heterogeneous one, and a volume with consistent density is a homogeneous one. The difference in render time and quality is… well, quite drastic:

Homogeneous vs Heterogeneous

Homogeneous (2m 40s, 512 samples) vs Heterogeneous (1h 4m 55s, 128 samples)

Yep, you read that right. Under 3 minutes for homogeneous volume and over an hour for a quarter of the samples in the heterogeneous volume. The heterogeneous render seems to have a less dense volume, and I guess it does since it was driven by a noise texture where I couldn’t easily control the density and honestly couldn’t be bothered to wait long enough to give it a decent try. Continue Reading…

How to Create Your Own HDR Environment Images

Download Free HDRI - lapaDownload Free HDRI - lapa

Download Free HDRI (2048×1024 - 6.6 MB)
Licensed CC0

Want more free HDRIs? Check out my new dedicated website: HDRI Haven


I searched long and hard for a way to create these magical images that light your scenes for you, and I never once found any article or mention of the process in any of the Blender forums. Every time I saw a render using image based lighting (IBL), the artist had always found it on some website (and was usually accompanied by a complaint about how Blender doesn’t give you nice hard shadows).

I’m no expert in this matter, but due to the lack of information that can be found easily, I’d like to share the little that I do know with you.

So in this guide I’ll show you the basics, but it’s up to you and the rest of the community to find out by experience what is good or bad practice and when to ignore everything you’ve ever been taught.

Continue Reading…