

Download Free HDRI (2048×1024 - 6.6 MB)
Licensed CC0
Want more free HDRIs? Check out my new dedicated website: HDRI Haven
I searched long and hard for a way to create these magical images that light your scenes for you, and I never once found any article or mention of the process in any of the Blender forums. Every time I saw a render using image based lighting (IBL), the artist had always found it on some website (and was usually accompanied by a complaint about how Blender doesn’t give you nice hard shadows).
I’m no expert in this matter, but due to the lack of information that can be found easily, I’d like to share the little that I do know with you.
So in this guide I’ll show you the basics, but it’s up to you and the rest of the community to find out by experience what is good or bad practice and when to ignore everything you’ve ever been taught.
What are HDRs?
Here’s where it gets interesting. There are basically three understandings of the term “HDR image” and it can get pretty confusing pretty quickly. Some folks refer to images that have been tone-mapped as HDR images, such as the one below:
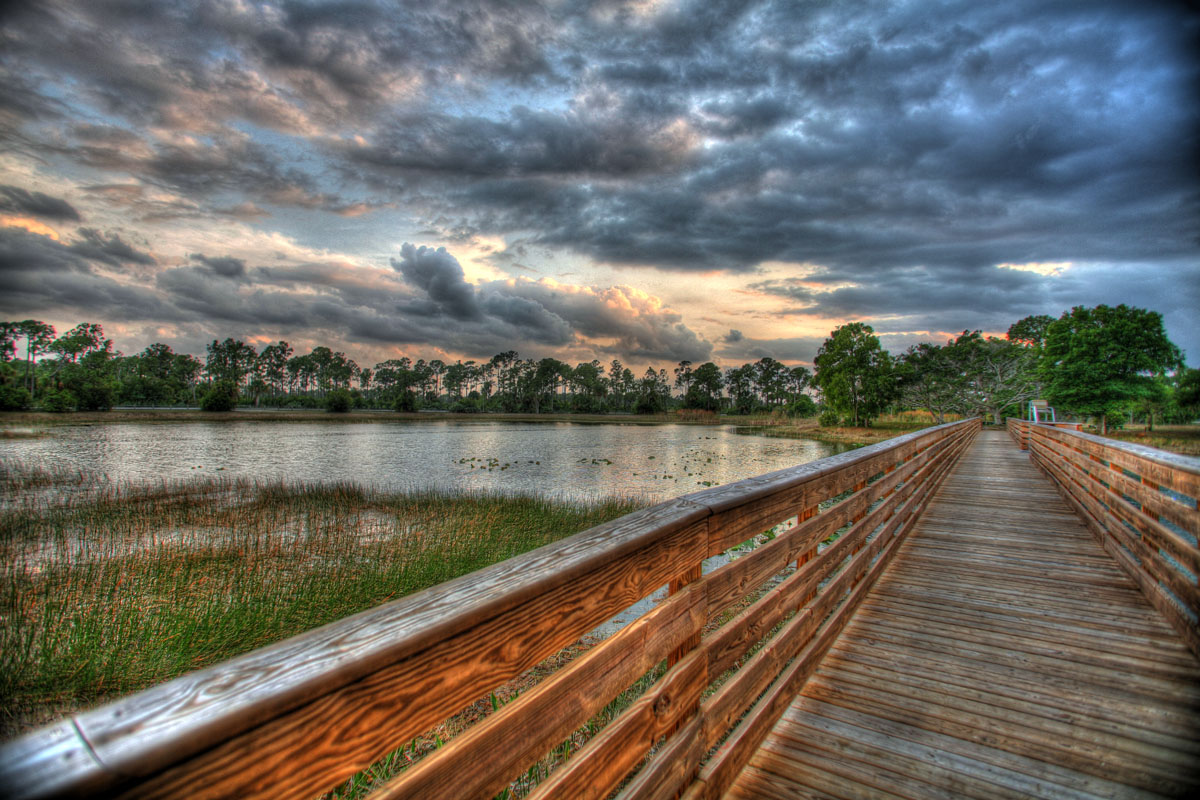
from captainkimo.com
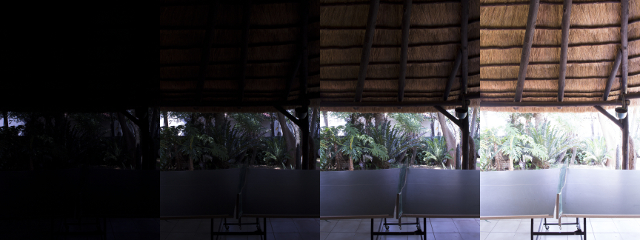
I shall refer to images like this as tone-mapped images, since we’ll be doing this as well later. You don’t actually use these for lighting, they just look kinda cool sometimes. To create these, you take a few pictures without moving the camera (using a tripod) and change only the exposure time between each one. If you take three images, you’ll have one that’s exposed nicely, one that’s over-exposed (very bright, but showing detail in the dark areas) and one that’s under-exposed (very dark, but showing detail in the bright areas). You can take as many images per shot as you like, separated by however many exposure values (EVs) as you like. Then you merge these images together to get an image that tries to be evenly exposed everywhere.
The other use of the term HDR image is what we CG artists use for lighting our scenes. While we do often use an image.hdr file, the proper term for this use is “Image Based Lighting”, or IBL for short. You don’t have to use an HDR image for lighting at all, you can use a JPG, PNG, TIFF or even an AVI if you like. The collective name for an image that will be used for lighting is thus an IBL.
As to what an HDR image really is, compared to regular PNGs or other LDR (Low Dynamic Range) images is simply an image that stores more than your usual 8 bits per channel per pixel, and usually allows for RGB values higher than 1.0). Red has an RGB value of [1.0, 0.0, 0.0], blue is [0.0, 0.0, 1.0] and thus a mix between red and blue is pink with [1.0, 0.0, 1.0]. White is just [1.0, 1.0, 1.0], and HDR image stores values higher than this and in more detail (think of it like more subdivisions). Unless you have one of them fancy 12/14 bit monitors, our screens can’t actually show us these colours so it’d be pointless to try to compare them side by side:
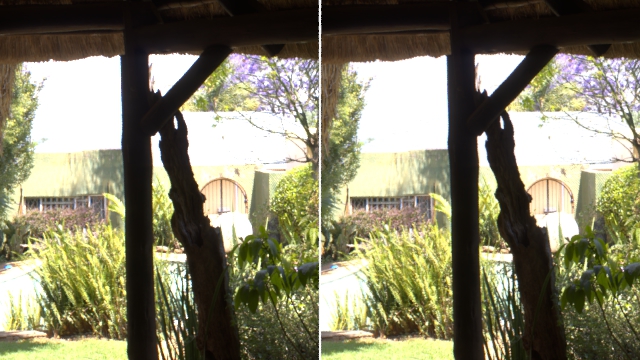
HDR vs LDR – no difference
However, when we multiply each image by 0.1, they gets darker such that white becomes 10% grey (1.0×0.1=0.1). Only with HDR images, we have data that goes above 1.0 and thus we can see things that used to appear just white:
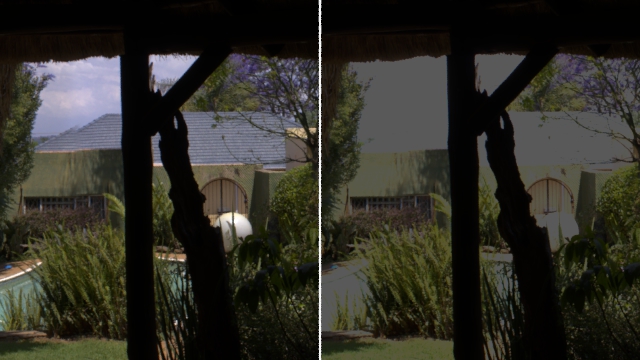
HDR vs LDR after multiplying them by 0.1
We can see the roof of the house and the sky in the HDR image, but the LDR one only had white there and thus can’t show us anything.
This is important for lighting, particularly with the sun or other bright sources. The scene below was lit with an HDR and LDR version of the same image:
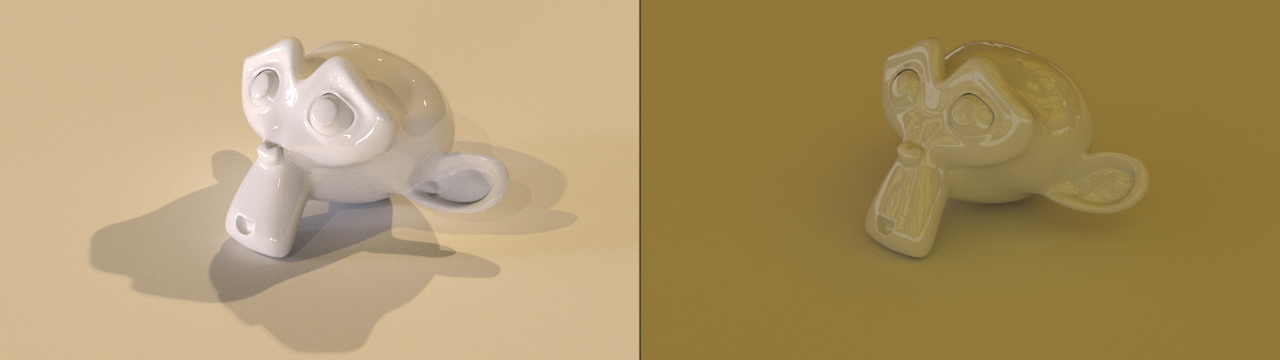
HDR vs LDR
Magic! The LDR doesn’t know the difference between the light sources and some other piece of bright image, but in the HDR image the light sources (perhaps with an RGB value of [50.0, 50.0, 50.0]) are much brighter than everything else (maybe [3.0, 3.0, 3.0])
Now that that’s sorted, let’s get to the actual making of these magical images.
Step 1: Shooting
Honestly you can use anything, yes even that $50 digital camera your aunt got you for your birthday last year, but a DLSR with a wide lens is the best. Typically the pros use lenses around 10mm, but the widest I’ve got is 18mm and it seems to work fine.
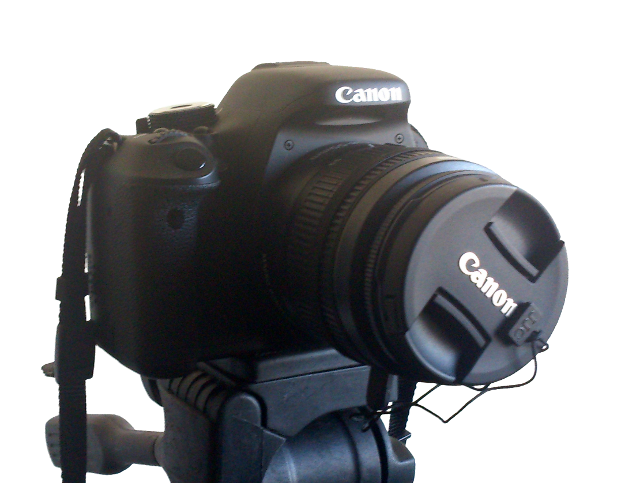 I have a Canon 600D with an 18-55mm lens and a cheap tripod.
The other thing that people like to use is a “panohead”, which is basically a thing you attach to your tripod that allows you to pivot in all directions while keeping the “nodal point” (the very center of your camera) in one place. If the nodal point doesn’t move, then rotating the camera won’t have any shift in perspective. This equipment isn’t cheap, but it’s not really necessary in most outdoor cases.
Let’s ignore the whole HDR thing for a moment and concentrate on creating a panorama. You have two options here:
- A mirror ball
- Stitching multiple images
I covered the very basics of using the mirror ball method in an old CG Cookie tutorial, you basically have a silver ball (like a christmas ornament or a steel ball bearing) and you take some photos of it from far away. I don’t really like this method because you’ll never get a perfect result, the ball might have scratches, might not be perfectly reflective and it might not be perfectly round. So we’ll use the other method this time, which is almost limitless in how high-res you want the image to be and doesn’t require you to edit out your own reflection afterwards.
To make a panorama, you don’t really need a tripod, but it does help a huge amount. I like to use the camera in portrait orientation because then I only have to take 3 levels of photos vertically, though more horizontally.
Just sit your camera somewhere, take a photo facing a particular direction that you can’t forget (facing north, or lined up with a nearby building or pole). Make sure the camera is horizontal and the ground is level (adjusting your tripod if it isn’t). Then look through the viewfinder or on your screen and slowly rotate the camera until about 70% of what you see is new stuff, and 30% of it is included in the previous image. You can even use a bigger overlap just in case, it doesn’t really matter. Take the shot and rotate again, repeating until you’ve done a full 360 and are back where you started.
 [camera from dktw, tripod from nukkio]
If you’re going to be doing this a lot, it helps to make small marks on your tripod so that you know how much to rotate without looking through the viewfinder every time.
Now we’ve got a horizontal strip of our scene, we need to do the same for what’s above and below this strip. So look at what you can see horizontally, and again slowly rotate the camera up until there’s a 30% overlap. Then begin taking a photo and rotating again. When you’re done with this, do the same pointing downwards.
Lastly, take a photo straight up and straight down so that we have covered the entire environment (the downward one isn’t important since we usually have a ground surface in our Blender scene, but we might as well right?).
Then all we’d do is feed these images into a program like Hugin or PTGui and it’ll stitch everything together and make us our panorama – but wait! This will only give us an LDR image!
So in order to create an HDR image, we need to take a series of LDR images for each direction and then tell some software how different the exposures are and it’ll merge them all together into one HDR image per shot.
Unfortunately most cheap point-‘n-shoot digital cameras won’t give you control over the exposure or aperture, but if yours does then great. The next problem is actually changing the exposure for every shot, if we had to take a photo, adjust the exposure while trying not to bump the camera too much, take another photo, adjust the exposure again, take the photo, rotate the camera, put the exposure back, take the… you get the idea, it’s madness.
That’s where it helps to have a nice modern DLSR. You might have some HDR function built-in, hidden in a menu somewhere – just make sure you tell it to save the layers separately without combining them on the fly, we need each photo separately. Since my camera is a Canon, I’ve installed an awesome piece of open-source firmware called Magic Lantern. Seriously, it’s magic. The only feature I use here is the bracketed HDR mode. You tell it how many images you want and how many EVs to separate them with, and then every time you push the shutter it’ll take all the different exposures one after the other.
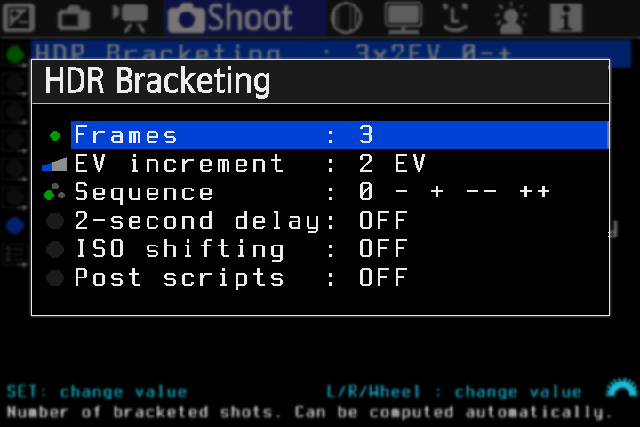
If you’re shooting raw images, then 3 images separated by 2 or 3 EV should be a good rule of thumb. If you’re shooting JPGs, then you might want to use 5 images separated by 2 EVs.
I’ve also got a remote for my camera so I can press the shutter button without touching the camera itself, but otherwise it might be a good idea to use a time delay as well just to make sure the camera doesn’t shake at all when you press the button. In the next step of merging the images into an HDR, you can usually enable an alignment feature just to make sure the images are aligned, but if you know they’re already perfectly aligned then it’ll export much quicker.
So now every time I take a shot and rotate the camera, it’ll be taking 3 (or more) photos with different exposures.
It’s important to get detail in the light sources, that’s why I took a fourth dark exposure. You can’t really over do it, it’s better to be safe than sorry right :)
And lastly a quick note about shooting raw images: Do it. You don’t have to, but raw images are actually an HDR format (in my case img.CR2) so it’s better to start with them. You can use JPGs sure, but just make sure you shoot enough increments to get all the detail in the image that you need. Also make sure your camera is set to store the EXIF data (shutter speed, aperture, focal length) in the image file, otherwise we’ll have to put it in manually later.
Step 2: Merging
So now we have all our images. In my case, there’s 155 of them. One way to do it to load all of them into our stitching program and use them directly, but there’s a few reasons to avoid this:
- Every image needs to have similar pieces to the neighboring images as well as the other images in that set (the same angle with different exposures), and since the exposure differences means different colour pixels, the software usually has a hard time in finding matching points and might end up asking you to place many of them manually (I spent about 4 hours placing control points for my Lounge pano last weekend before learning the alternative).
- If you are forced to place those matching points manually, the different exposures make it hard to see the images yourself. The software will have a preview exposure slider, but it works for both images at once and thus isn’t really helpful.
- It’s really, really slow. On a single core CPU it could literally take more than a day to stitch your panorama.
- If there’s anything you need to Photoshop out of one shot, like your own shoe or the leg of your tripod, you may have to do it to each image in the exposure set. You might be able to do it at the end to just the final image, but equirectangular mapping can be quite confusing, especially if you need to paint in a straight line.
So instead, we’re going to create a tone-mapped image and a merged HDR image for each of our exposure sets. We’ll give the tone-mapped images to the stitcher, then once everything is aligned we swap them out with our merged HDR images. The tone-mapped images are nice and flat without many very dark or very bright areas – the stitching algorithm will run quickly on these JPGs and we won’t have any trouble adding control points manually.
There are many programs that can do this, but I really like Photomatix – it’s really easy to use and has a super cool batch processing function. It’s not free though, and unfortunately it’s really hard to find a free alternative. HDR Shop used to be free for non-commercial and academic use, but they’ve since dropped that option. If you do know of some software that’s free and can do this stuff, please tell us!
So in Photomatix, we can go straight to the Batch Bracketed Photos option:

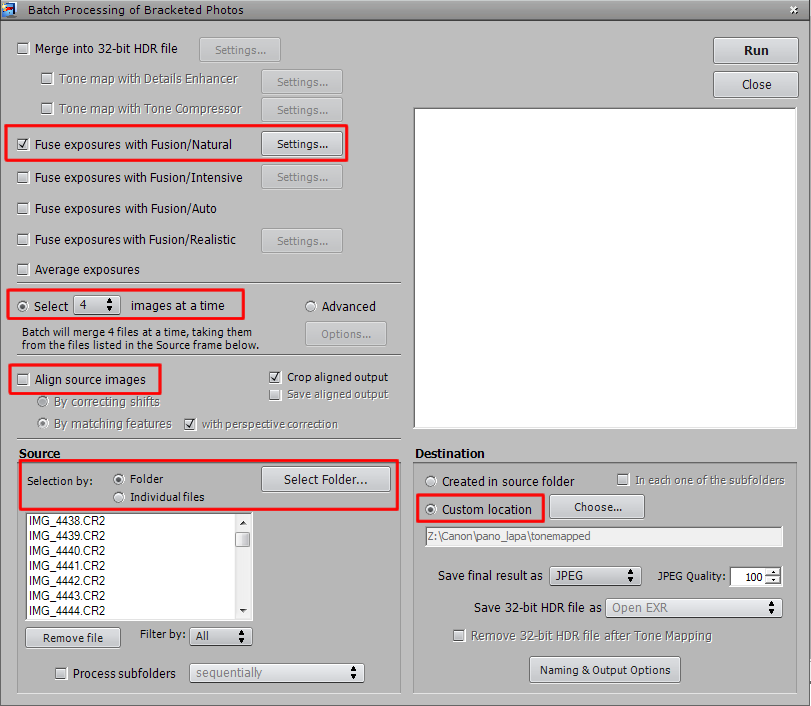
Make sure only “Fuse exposures with Fusion/Natural” is checked, then specify how many images there are per shot (in my case there were 4 different exposure images in each set). If you used a tripod, uncheck “Align source images” so that it’ll go quicker, but if you did it by hand or aren’t completely certain they’re perfectly aligned just leave it checked. Select the source folder with all the images, and tell it where to save the new tone-mapped ones. Finally hit Run and go get some coffee.
When that’s finished you should have a nice set of pretty tone-mapped images like this one:
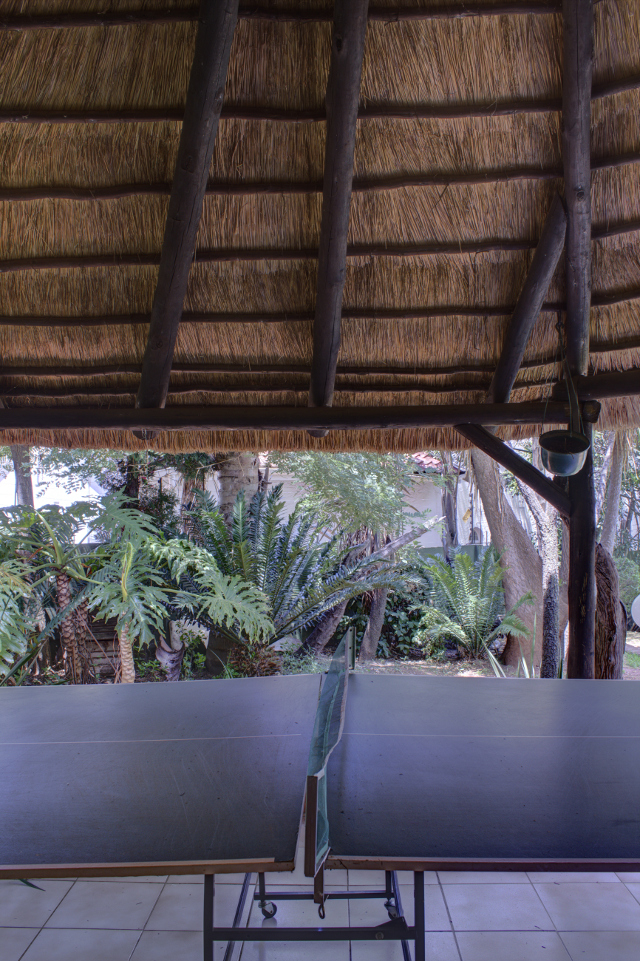
This is basically useless for lighting purposes, but it’s easy on the eyes and evenly exposed.
So before we start with stitching we can also export the bracketed HDR images from Photomatix.
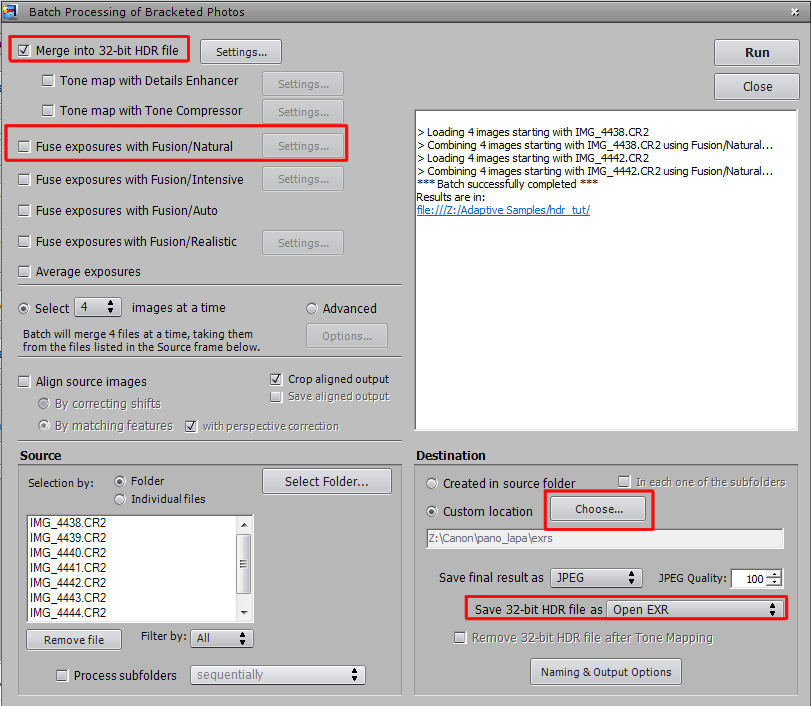
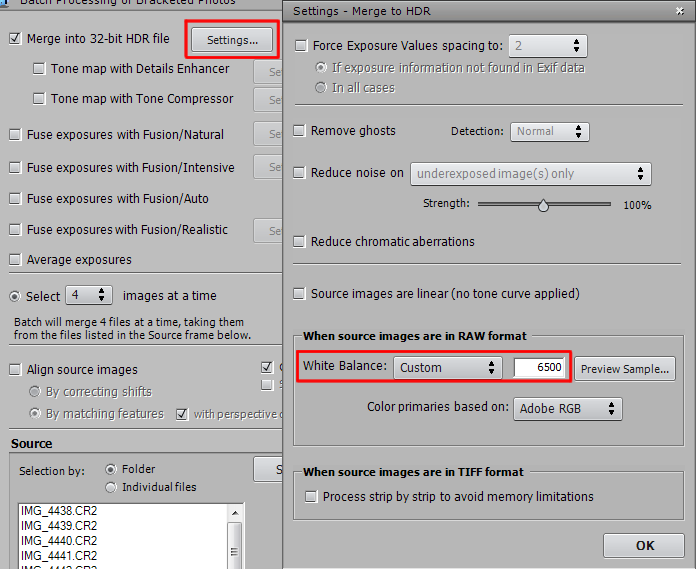
Just uncheck “Fuse exposures with Fusion/Natural” and check “Merge into 32-bit HDR file” instead. Then choose another folder to save the images to. I also prefer to use EXRs instead of HDRs, but it makes no difference really.
If you want to adjust your white balance at all, now is a good time to do it. Just click the Settings button next to the HDR check-box and enter a custom value there.
Then hit Run again and go get some more coffee.
Step 3: Stitching
Now for the fun stuff. Sort of.
Here I’m going to use PTGui. A free alternative called Hugin is also great, I just never managed figured it out properly.
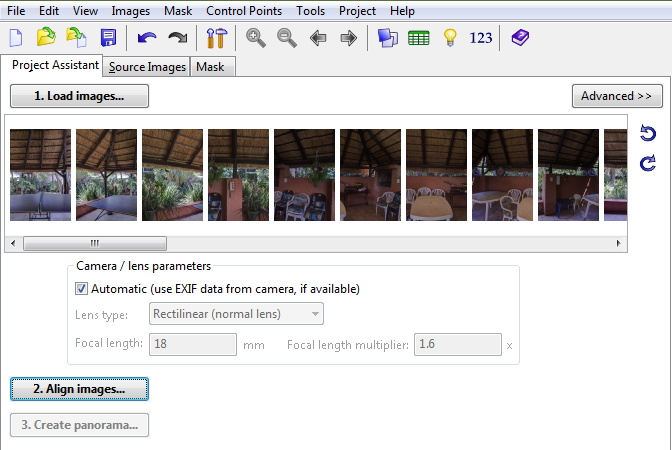
Upon opening PTGui or Hugin, you’re presented with a nice wizard type thing that’ll help you along the process of creating the panorama.
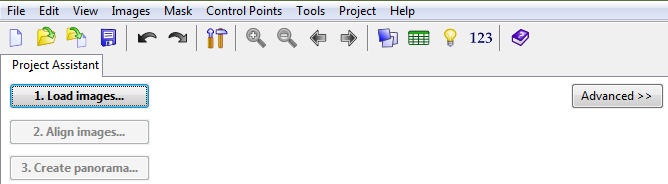
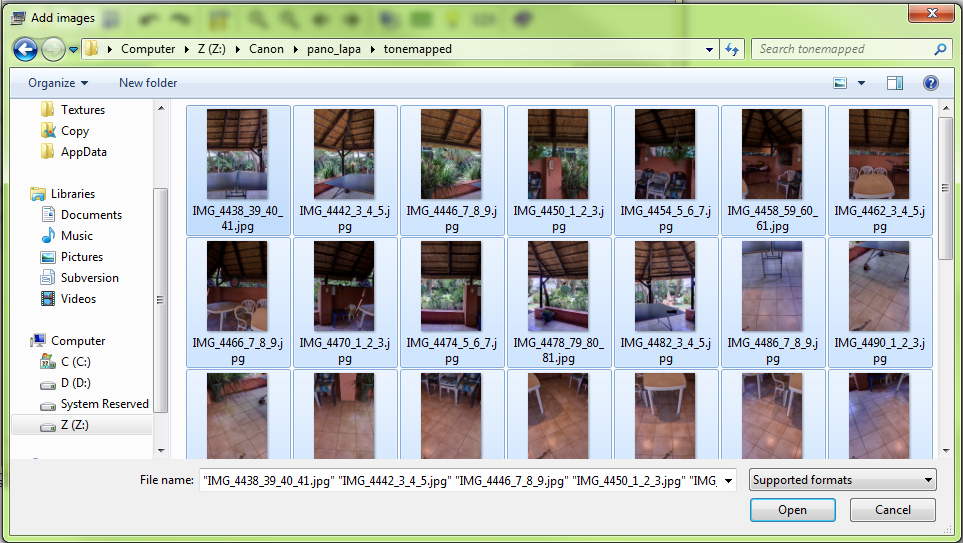
So the first thing to do is to bring in all the tone-mapped images:
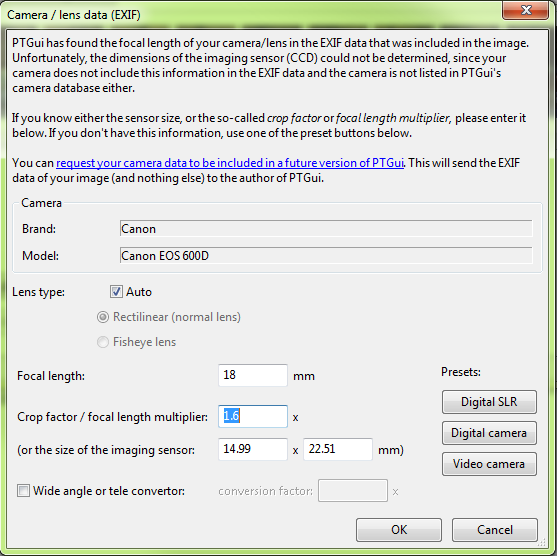
It’ll now ask us what lens we have and what our crop factor is. Unless you know for sure that your camera has a full-frame sensor, then it definitely has a crop factor. Just google your camera name and “crop factor” and you’ll find it quick enough. It’s not important to know what this factor means, but it is important to tell PTGui what it is. Mine is 1.6 and my lens is 18mm (if you’re using a non DSLR, you’ll have to google what your widest focal length is in millimeters).
Just wait a moment for all the image thumbnails to show up and then punch the Align Images button. This will scan all the images for matching control points.
If it pops up an error at the end about some orphaned images, just read what it says and follow the prompts. PTGui and Hugin are both very good at holding your hand through everything. You’ll just have to manually place a few control points to tell it what images correspond to each other and how to stitch them together.
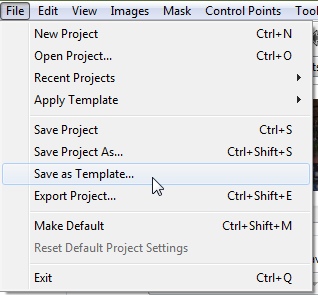
If/once everything is fine and dandy, we’re finished with the tone-mapped images. Now we can tell it to stitch the HDR/EXRs in exactly the same way as it stitched the tone-mapped images. In PTGui we can simply go File > Save as Template to store a file that contains all the control points and alignments. I’m sure Hugin has something similar since it also has an “Apply Template” option in the File menu.
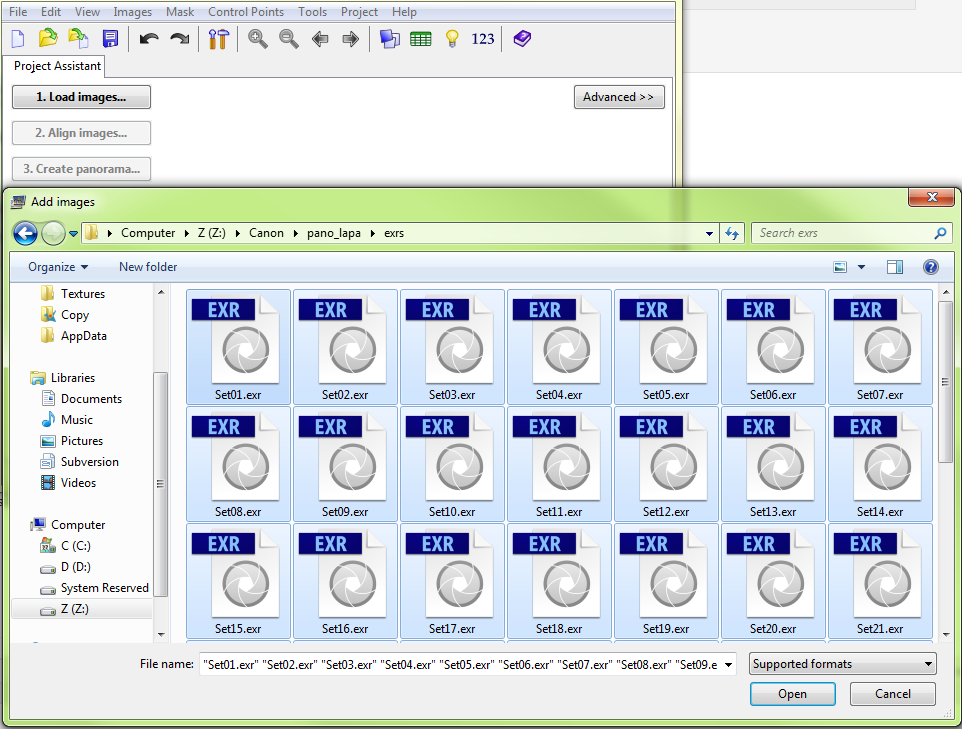
Now we can create a new project with File > New or the convenient universal hotkey Ctrl+N. We don’t need to save that project since we don’t need to stitch the tone-mapped images themselves. In the new project, load in the HDR/EXR images:
And again tell it what lens and crop factor you used. Once all the thumbnails have loaded, simply go File > Apply Template > whatever-you-called-it
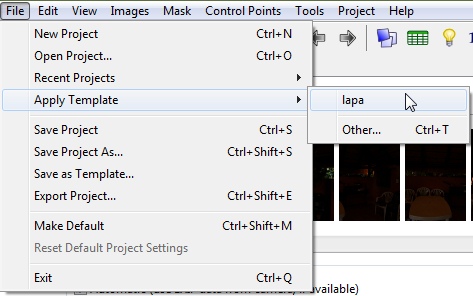
And magically all our new images will be aligned and warped into the right place :)
All that’s left to do is a sort of render. Everything you’ve seen up until now is just a low-res preview, saving out the high-res HDR file and blending everything together smoothly can take some time.
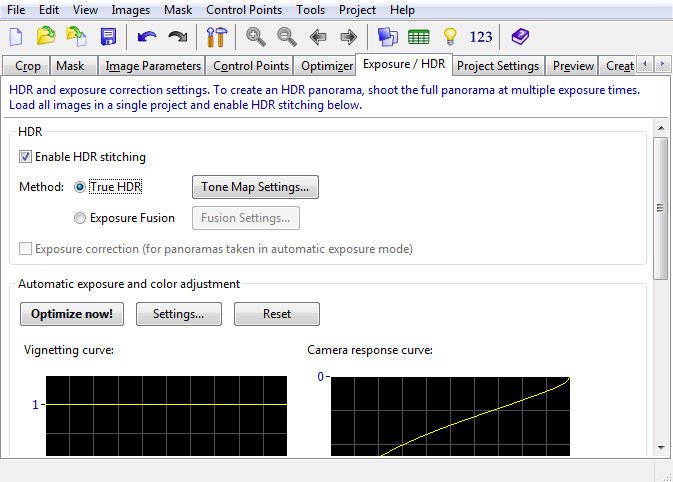
So just tell it that we want a True HDR output (leave the Tone Map Settings on default values, we don’t want it to tone-map anything):
Then choose what resolution you want to export and where to put it. Check only the “HDR panorama” option at the bottom, we don’t need anything else.
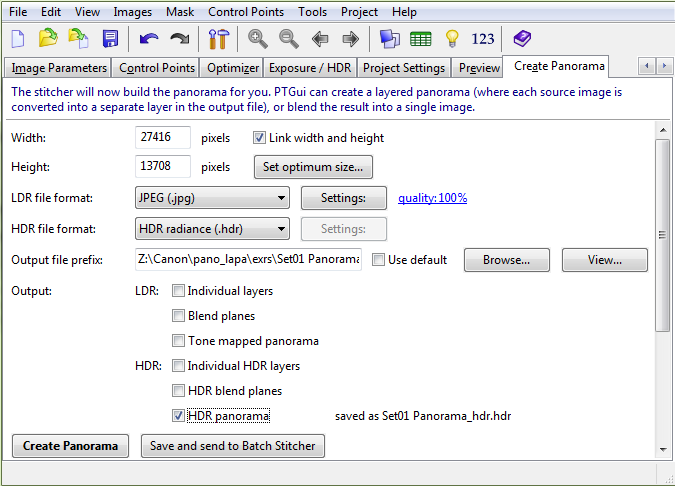
Finally click that tasty Create Panorama button and go get a truckload of the rarest coffee beans you can find. This is going to take a while.
Step 4: Saving
27416 x 13708 is definitely overkill for a resolution – in fact for me Blender just crashes if you try to load it in, without the usual “CUDA out of memory” error even. So the last thing we need to do is save the HDR into a usable size. You don’t have to, but I like to keep a few different resolutions around for different needs:
- An 8192×4096 HDR is the biggest I keep, used for any mad close-ups of reflections or for detailed lighting.
- A 4096×2048 HDR for some slightly saner situations, but still fairly high-res
- A 2048×1024 HDR for low-ish-res lighting, usually for when I have some other sources of light but still want a nice environment to reflect.
- A 2048×1024 jpg image just so I can see what the panos look like without having to open them in Photoshop or Blender.
- Finally, a 600×300 low quality jpg mostly for web use – like the image at the top of this post, or possibly for some really cheap, fast, flat fill lighting in a scene where the lighting is done with lamps or mesh emitters but I still want some environment.
So just load the massive image into Photoshop/something, resize it and save it out again. Gimp doesn’t recognize HDRs or EXRs unfortunately, so if all you have is Gimp you may want to save the 8kx4k image straight from PTGui/Hugin, then use a panoramic camera in Blender to render the smaller resolutions. If you know a free image editor that recognises either of these formats, let us know in the comments :)
Step 5: Rendering
Update 2016: This method is pretty much just wrong. See this post instead.
Finally, I might as well include a tiny section for those who know little about this sort of lighting method.
 The setup is quite simple.
In the World settings, we hit the Use Nodes button if it’s there and then connect an Environment Texture to the Background color (not an Image Texture, those don’t get mapped properly). That’s enough to get some simple fill light in your scene, but if you want to use the HDR to actually light your scene, there’s some more things to remember:
- Check Multiple Importance Sample at the bottom of the World settings (on the right in the screenshot above). In short, this makes blender analyse the image to figure out where the light sources are and thus reduce a lot of noise. (seriously, this is the most important thing to remember, it makes a huge difference). If you’re using a high-res image like me, you’ll probably want to increase the Map Resolution quite a bit, though 2048 is very high, 512 or 1024 should be enough in most cases.
- Add a MixRGB node between the Environment Image and the Background shader, change the type to Multiply. Connect it to both the Color and Strength inputs of the Background Shader – this will give us nice sharp shadows.
- To control the brightness/intensity of the environment lighting, add a Value node and plug it into the bottom input of the Multiply node.
- Change the Color Space option of the Environment Texture node to Non-Color Data. This is because an HDR image is not meant to be used for its color, but rather for its lighting information, and thus Blender shouldn’t do any color-space conversions on it. Depending on how you saved the HDR image and what format it’s in, this may not actually be necessary, but it’s good habit to do it anyway.
- Finally, if you want to rotate the background image, add a Texture Coordinate node and use the Generated output. Drop a Mapping node between the coordinates and the environment texture and use the Z-rotation to turn it around.
Step 6: Celebrate
And that’s it! Trade that truck-load of coffee for something that does the opposite of keeping you awake and pat yourself on the back for a job well done!
Now go find some interesting places to shoot environment images and share it with the rest of us!
These HDR files can be pretty big, so if you need some permanent hosting I’d be happy to keep it on my server for you as long as you’re happy with sharing it publicly (with a Creative Commons license for example)
The final panos created in this tutorial can be downloaded from the top of this page.
Things I’ve learnt since last week’s panorama:
If you’re serious about making your own HDR environments, you’re going to need to spend a few bucks. Try out the free stuff first of course, but in my experience the pro stuff is a lot more hassle-free. If you’re only going to be doing this once or twice, you can get away with the free stuff quite easily.
It’s not as hard as I used to think it was. Because websites with free HDR panos are quite rare, and I could never seem to make them myself, I figured it was a very difficult thing to do. But really if you have the right gear and the right software, it’s perfectly painless.
It’s ok to take an unnecessary amount of photos – shoot everything more than you need to with more exposures than you need. It doesn’t really slow you down that much and it’s better to be safe than to realize you forgot a camera angle or didn’t have enough overlap between each rotation. It’s often impossible to go back to the same location and get the same weather again.
If you’re shooting near sunset or sunrise, move quickly and start with the sky. It changes so much in even just a few minutes, I had to give up once because I could tell how different the lighting was after a just few shots.
wow! Really great indepth post! Thank you!
onestly i’ve seen a lot of tut on HDR. But, this is the first time i’ve seen one done good! :D
Very much good information! Thanks for sharing Greg!
holy crap, a lot of fantastic information, and all in just the one post, thanks for such awesomeness..
Pretty good. Thanks for sharing.
Boet. When do you get time do all this? Nice Tutorial.
I had success today creating an HDRI map using hugin, with the help of this guide.
http://arts.brighton.ac.uk/__data/assets/pdf_file/0010/44956/Creating-HDR-Panoramas.pdf
I don’t have much experience with any of the programs you use, but I didn’t find Hugin very user-friendly, especially documentation-wise, for this particular HDRI purpose. Anyway, this guide helped me a lot, and your advice and setups in Blender. Thanks !
OSS for HDR’s http://qtpfsgui.sourceforge.net/
If you think you dont need a panoramic head, and want to capture closer objects, you gonna have a bad time. Parallax errors are the bigest Problem in stitching panoramas.
Thanks
Greg,
I am really impressed, this is extremely thorough. This is one I will save, read & re-read until it all soaks in.
awesome post! thank you so much for sharing all this information with us! ;)
Great article; many thanks. http://www.tawbaware.com/ (PTAssembler) is another alternative to ptgui. I have this book in my amazon wish list; I should really go ahead and buy it: The HDRI Handbook 2.0: High Dynamic Range Imaging for Photographers and CG Artists; http://tinyurl.com/khjclnz
Thanks again!
Small correction, the ‘nodal’ point is not the center of the camera, but rather the point the image after entering the lens, inverts before hitting the sensor. Here is a tut on how to find that : http://www.johnhpanos.com/epcalib.htm
Also, for even greater accuracy, you can build your own Panohead, just Google ‘DIY Panohead’, lot’s of options.
Indeed it is! And thanks for the link, I’m just looking to buy a panohead now, will be helpful.
Ho very great adress, your tut is amazing! Top-notch!
Congratulations
Spirou4D
This function “apply template” does not work for me. When a i have the JPGs pano ready i save the tamplate. But when i load the HDRs, wait all the thumbnails and apply the template my image does not “magically” go to the right place. It get a mess!! Reading a little bit in PTGui’s site theres a topic saying tha this not apply the control points in the reality, but other parameters.
Can you give me a light?
Thanks for this tuto by the way. This is helping a lot!
That’s an interesting node setup
Spectacular! I have been searching for a post on this topic for awhile. Thanks and great job.
Thanks for this great info!
Your method gives great results. Thanks so much!
The cuda out of memory error is only when using your (nvidia) graphics card to render, using blender cycles (?) – which only has as much ram as your card – typically much less than the computer. There are limits on texture-sizes using cycles.
Otherwise blender can use all the memory in your computer? Blender can use up to 8giga-gig (some insanely large number that is definitely not *only* 8 gig) of ram.
Great tutorial – stuff I needed to know – thanks!
Luminance HDR has a batch processing option, and supports a wide variety of HDR algorithms, image stabilization, etc… The batch processing option was used, for example to create these time lapses: https://www.youtube.com/watch?v=PPnxj6L0gkQ, https://www.youtube.com/watch?v=k6XSfEChP74, https://www.youtube.com/watch?v=msPgNhDBGow
Hi Greg, great article, I’m there since you launch hdri-haven; I aim to make hdri’s with floss only softwares; Can I have precisions on your editing process ( masking tripod for example? ), do you erase it from all your bracketed nadir shots? And to make a 24 stop hdri : I believe you make it with rawtherapee from the raw files: am I true?
You probably know this by now, but Krita supports HDRs and EXRs. You can actually color-pick your crazy value sun and paint with it!