Commonly Ignored Feature #8: Quick Simulations

I really like these CIFs, I really wanted to do these more often – the plan was twice a week. But the problem is, I’ve run out of things that people usually don’t know about :)

Anywho, here’s a little hidden gem I remembered recently:
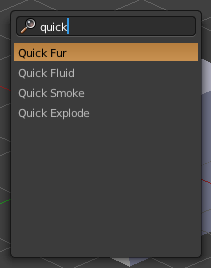
Quick Fur/Fluid/Smoke/Explode

2014-01-09_20-25-09

out

As far as I know, there is no shortcut to these operators, nor do they appear anywhere in the interface (nor can I think of a good place to put them). The only way to find them is to search for them in the Spacebar menu.

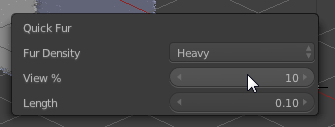
These four functions are simply a quick way to set up a basic simulation. Each of them have some options you can adjust in the lower part of the toolbar, or in the F6 popup.

2014-01-09_20-26-51

Honestly though, I’ve never actually used these. Old habits die hard perhaps? :P


Volumetrics are coming!

Brecht has begun adding all the Volumetrics work that all our great devs, Storm, Thomas, Stuart, Lukas and Brecht have been working on!

It’ll be a just little while before we have support for smoke simulation data, for now it’s just some basic absorption and soon some scattering and emission.

Commit from Brecht:
https://developer.blender.org/rBe369a5c48529864118d49222dde3d530d58ebeae

Cycles Volume Render: support for rendering of homogeneous volume with absorption.

This is the simplest possible volume rendering case, constant density inside
the volume and no scattering or emission. My plan is to tweak, verify and commit
more volume rendering effects one by one, doing it all at once makes it
difficult to verify correctness and track down bugs.

Documentation is here:
http://wiki.blender.org/index.php/Doc:2.6/Manual/Render/Cycles/Materials/Volume

Currently this hooks into path tracing in 3 ways, which should get us pretty
far until we add more advanced light sampling. These 3 hooks are repeated in
the path tracing, branched path tracing and transparent shadow code:

  • Determine active volume shader at start of the path
  • Change active volume shader on transmission through a surface
  • Light attenuation over line segments between camera, surfaces and background

Soon!

Color Ramp Improvements

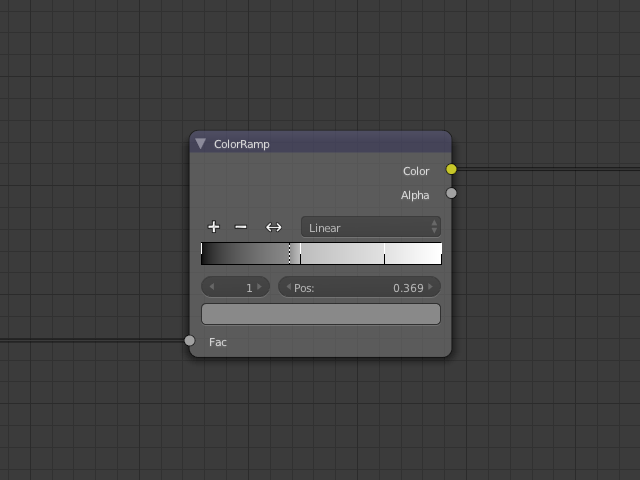
color-ramp

Let’s be honest, these have been a long time coming – in fact the lack of some easy and precise controls for color ramps used to be one of  the things I hated the most, I use them quite a lot. In fact, it was even pretty high on my Todo list for Node Wrangler to add these features myself, though I couldn’t find a simple and usable way to do it.

But luckily, Krantz Geoffroy (kgeogeo) has come to the rescue, bringing a Position slider for precise control over the location of the active color stop. Other new additions include an input for the index of the active stop (in case you have trouble selecting the right one) and some welcome rearrangements of buttons (including the color ramps in BI textures and the rest of the UI)

I suppose the only thing left on my wishlist for Color Ramp features is some more interpolations, like squared and cubed  falloff, and the inverse of each.

Oh and in case you were wondering where I disappeared to for the last two weeks, I was on holiday in Scotland visiting (and meeting for the first time) my Blender Nerd partner Rex :) but more on that later.

Auto Tile Size addon updated (again)

Well when I started this blog, I would never have imagined it would turn into a code blog. I guess once I started doing shading and lighting more often at work, I lost interest in doing anything like that at home and turned to a new hobby.

Anyway, I fixed the issue with Blender Internal renderer getting stuck on tile sizes meant for Cycles, so BI now get’s it’s own tile size stored separately (defaulting at +-64). I also made sure no other renderer would get stuck using the same tile sizes by simply disabling it when the scene is not using BI or Cycles. And lastly a tiny UI tweak, hiding the target size behind a settings button since unless you really know what you’re doing you probably shouldn’t touch it anyway.

[Download Auto Tile Size Addon]

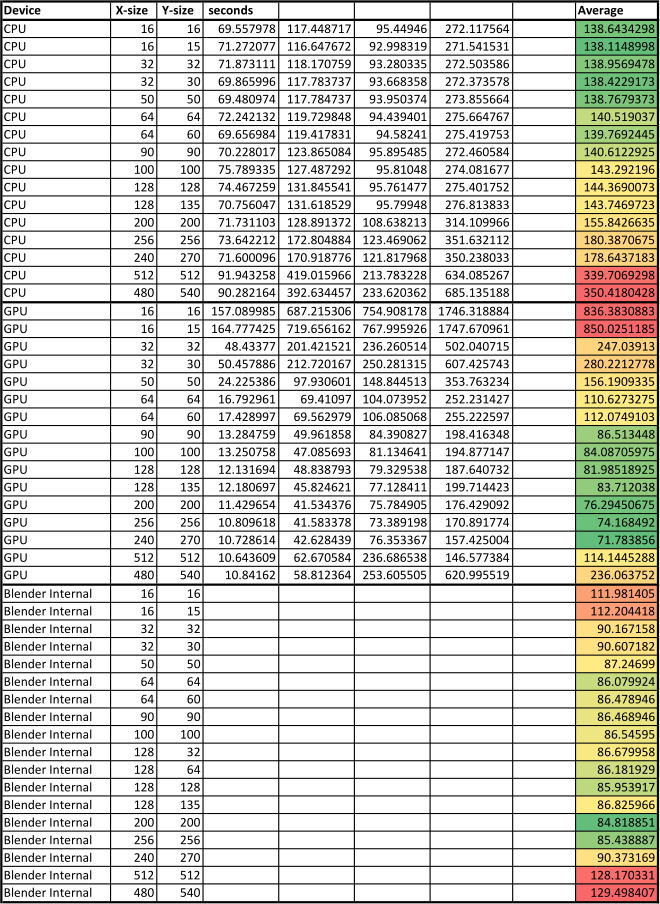
I also did a fair amount of testing to make sure my old assumptions were actually correct, and turns out they are:

tile_size_stats

I tested four very different scenes in Cycles using both GPU and CPU, with different resolutions and scene content.

As you can see, CPU likes small tiles and GPU likes bigger ones – whether or not the tiles are all the same size doesn’t seem to matter as much as I thought, although it does matter on the GPU if they are drastically different, such as very thin tiles on the edge, but that’s probably because the tile has a smaller area and not really anything to do with how square it is. Still, I stick with my original logic just to avoid these corner cases.

The story with Blender Internal is a little different. Here I only tested one scene at 1080p, either because I was too lazy to try some more, because others told me the best size already, or because the results of this one test were pretty conclusive. You choose. The point is that tile sizes in BI really don’t matter all that much. The main reason why the render gets slightly slower as the tile size decreases is because it has to look too see what’s inside that tile before rendering, and thus there’s a small overhead of render time for each tile, thus the more tiles there are the longer it takes.

Lastly, one of the reasons why the render takes longer in all three cases (Cycles GPU, CPU and BI) with large tiles is mostly because there are more tiles than there are threads available. For example 512×512 tiles in a 1024×1024 image means there’s only 4 cores of your CPU renderering, the rest are doing nothing at all. This might not matter too much with GPU rendering as you can see in the first two tests, since you only have 1 or 2 tiles rendering at once anyway.


Batch Renamer

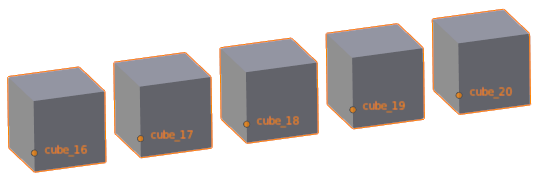
batch_rename_screenshot2

batch_rename_screenshot

[Download]

I’ve had this one for a while now, but it’s been a mess of slightly working code until recently – but now I like to think it’s unbreakable! (yes, that’s a challenge)

It’s a simple renaming tool meant for a bunch of similar objects. All it will do is rename them to something consistent with incrementing numbers (name_01, name_02, name_03…)

You have control over the starting number and the sorting of the objects, and that’s about all you need really. I have considered doing something more complicated with bones and left/right versions and whatever, but I seldom need such a thing anyway.

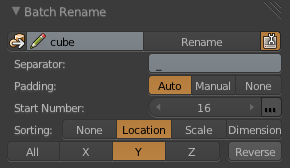
Here’s an explanation of each item in the interface:

separator

Get base-name: (first icon-button at the top left) Sets the base-name to that of the active object (stripping it of any numbering it already has)

Base-name: What to name the objects as (base_name_01, base_name_02….)

Rename: The big button to do the renaming

Advanced: Show all the options and controls

Separator: How to separate the base name and the numbers (name_01, name.01, name-01 or any separator of your choice, doesn’t have to be a single letter)

Padding: The number of digits in the numbering, adding trailing zeros to fill the space (name_01, name_001 or name_0001…) – Auto mode will figure out how many objects are selected and thus how much padding is needed. Manual mode will allow you to choose how much padding you want, but will increase it automatically if it’s not enough. None mode will not add any trailing zeroes.

Start Number: Begin naming the objects with number starting from here.

Continued Numbering: (ellipse icon just to the right of the start number) Increase the start number every time you rename objects such that you can carry on numbering from where you left off last. I suggest you use Manual padding for this one, since if the total number of objects renamed goes above the next level of padding (above 100 for example) then there will be inconsistent padding (name_05, name_89, name_134 – different amount of digits)

Sorting: How to sort the objects, by location, scale or dimensions. Dimensions is useful to use as a “visual” scale – think 1000 rocks of different sizes but all with 1.0 scaling.

Sorting Axis: In which direction to sort them – on one of the axes or on the average of them (‘All’)?

Reverse: Flip the order of the sorting, E.g: go right-to-left instead of left-to-right

separator

And that’s it!

Please rip it to shreds. Find any bugs, suggest any features. And if you feel like it, I’d appreciate a code-review too.